

Note for teachers using this lesson plan
This lesson introduces pupils to the fascinating concept of the water cycle and how rain is formed. Prepare the simple demonstration materials (water, stove, metal cup, ice) beforehand to make the concepts of evaporation and condensation concrete and engaging. Emphasise safety during the demonstration. By the end, pupils should clearly understand the continuous movement of water and be able to draw a basic water cycle diagram.
Class: Primary 4
Term: First Term
Week: 10
Age: 9 years
Duration: 45 minutes
Subject: Basic Science and Technology
Curriculum Theme: Our Environment
Focal competence: Applying scientific methods to interpret environmental processes involving water
Key competencies/values: Research and Problem Solving; Communication; Environmental Literacy; Creativity and Innovation
Skills:
- Drawing the water cycle
- Design aesthetics
Previous Lesson: Middle-Distance Races, Techniques for 800 m and 1500 m
Topic: Water: Water Cycle And Rain Formation
Subject Matter: Water cycle, process of rain formation and relationship between the two
Specific Objectives
By the end of the lesson, pupils should be able to:
Cognitive Domain
- Describe the water cycle.
- Describe the process of rain formation.
- Explain the relationship between the water cycle and rain formation.
Psychomotor Domain
- Draw the water cycle.
Reference Materials
The following resources were used in planning this lesson:
- 2025 Revised 9 Years Basic Education Curriculum
- Relevant State Unified Scheme of Work
- Basic Science and Technology for Primary 4
- The HeadTeacher Scheme of work
Instructional Materials
The teacher will teach this lesson with the aid of:
- Water
- Stove or heating plate
- Metal cup or tin
- Ice/freezer (or cold water)
- Cardboard paper
- Diagrams or charts showing the water cycle
- Video clips on the water cycle
- Marker pens and whiteboard/chalkboard
Rationale for the Lesson
Understanding the water cycle is fundamental to appreciating how water moves through our environment and sustains life. This lesson helps pupils grasp the natural process of rain formation, which is essential for agriculture and freshwater supply. It also encourages observation and scientific thinking about everyday natural phenomena.
Prerequisite/Previous Knowledge
Pupils should have a basic understanding of water and its importance in daily life. They should also know that water can be hot or cold.
Lesson Content/Board Summary
Water: Water Cycle And Rain Formation
Meaning of the Water Cycle
The water cycle, also known as the hydrological cycle, is the continuous movement of water on, above, and below the surface of the Earth. It involves changes in the state of water from liquid to gas and back again.
Stages of the Water Cycle
The water cycle has several main stages:
- Evaporation: This is when water changes from a liquid state to a gaseous state (water vapour) due to heat, usually from the sun. Water evaporates from oceans, rivers, lakes, and even from plants.
- Condensation: As water vapour rises into the atmosphere, it cools down. This cooling causes the water vapour to change back into tiny liquid water droplets or ice crystals.
- Cloud Formation: These tiny water droplets and ice crystals group together in the sky to form clouds.
- Precipitation (Rainfall): When the clouds become too heavy with water droplets, the water falls back to the Earth’s surface. This can be in the form of rain, snow, hail, or sleet. Rain is the most common form of precipitation in many parts of Nigeria.
- Collection: The water that falls back to Earth collects in various places such as oceans, rivers, lakes, ponds, and underground. Some of it also soaks into the ground to become groundwater.
Relationship Between Water Cycle and Rain Formation
Rain formation is a key part of the water cycle. It is the stage of “precipitation” where water returns to the Earth’s surface from the atmosphere. Without the water cycle, there would be no evaporation to form water vapour, no condensation to form clouds, and therefore no rain.
Simple Demonstration of Evaporation and Condensation
To demonstrate:
- Heat some water in a pot or kettle (evaporation).
- Hold a cold metal cup or tin with ice over the steam rising from the hot water (condensation).
- Observe water droplets forming on the underside of the cold cup, mimicking cloud formation and precipitation.
Diagram of the Water Cycle
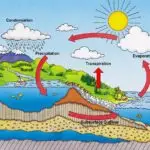
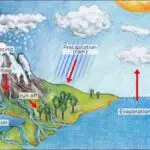
A diagram of the water cycle shows the sun heating water bodies, causing evaporation. The water vapour rises, cools, and condenses to form clouds. These clouds release water as precipitation (rain), which then collects in water bodies or on land, completing the cycle.
Teaching Methods/Instructional Techniques
Discussion, Demonstration, Explanation, Question and Answer, Visual Aids, Drawing Activity
Instructional Procedures
Step 1: Introduction
Time: 5 minutes
Teaching Skill: Activating prior knowledge
Teacher’s Activity: The teacher greets the pupils and asks them to mention different ways they use water daily. The teacher then asks where the water comes from and where it goes after use.
Pupils’ Activity: Pupils respond to the questions, mentioning uses like drinking, bathing, cooking, and sources like taps, wells, and rivers.
Learning Point: Importance and sources of water
Step 2: Explanation of Water Cycle Stages
Time: 7 minutes
Teaching Skill: Visual explanation
Teacher’s Activity: The teacher displays a large diagram or plays a short video clip of the water cycle. The teacher introduces the term “water cycle” and briefly explains that water is always moving in a continuous loop. The teacher then introduces the main stages: evaporation, condensation, cloud formation, precipitation, and collection.
Pupils’ Activity: Pupils observe the diagram/video and listen attentively to the teacher’s explanation of the water cycle and its stages.
Learning Point: Water cycle concept
Step 3: Understanding Evaporation
Time: 6 minutes
Teaching Skill: Demonstration/Observation
Teacher’s Activity: The teacher conducts a simple demonstration of evaporation by heating water in a pot. The teacher explains that the sun’s heat causes water to turn into an invisible gas called water vapour, which rises into the air. The teacher asks pupils to observe the steam rising.
Pupils’ Activity: Pupils observe the steam from the heated water and listen to the explanation of evaporation.
Learning Point: Evaporation process
Step 4: Understanding Condensation and Cloud Formation
Time: 6 minutes
Teaching Skill: Demonstration/Explanation
Teacher’s Activity: The teacher holds a cold metal cup (with ice) over the rising steam. The teacher points out the water droplets forming on the underside of the cup and explains that this is condensation, where water vapour cools and turns back into tiny liquid droplets. The teacher relates this to how clouds are formed in the sky.
Pupils’ Activity: Pupils observe the water droplets forming on the cold cup and understand how condensation leads to cloud formation.
Learning Point: Condensation and clouds
Step 5: Understanding Precipitation and Collection
Time: 6 minutes
Teaching Skill: Explaining natural phenomena
Teacher’s Activity: The teacher explains that when clouds become heavy, water falls back to Earth as precipitation, mainly rain. The teacher then explains how this water collects in rivers, lakes, and oceans, completing the cycle. The teacher also explains the relationship between the water cycle and rain formation.
Pupils’ Activity: Pupils listen and ask questions about rain formation and how water collects.
Learning Point: Rain formation and collection
Step 6: Drawing the Water Cycle
Time: 6 minutes
Teaching Skill: Guided drawing
Teacher’s Activity: The teacher distributes cardboard paper and guides pupils to draw a simple, labelled diagram of the water cycle, showing all the stages discussed. The teacher moves around to assist and correct.
Pupils’ Activity: Pupils draw and label the water cycle diagram on their cardboard papers.
Learning Point: Water cycle drawing
Step 7: Evaluation/Review
Time: 5 minutes
Teaching Skill: Questioning/Assessment
Teacher’s Activity: The teacher evaluates the learning by asking the following questions:
- What is the water cycle?
- Mention two stages of the water cycle.
- How is rain formed?
- What is the relationship between the water cycle and rain formation?
Pupils’ Activity: Pupils answer orally and in writing.
Learning Point: Water cycle understanding
Step 8: Note-Taking
Time: 4 minutes
Teaching Skill: Guided Writing
Teacher’s Activity: The teacher guides pupils to copy the essential Board Summary notes on the water cycle and rain formation into their notebooks.
Pupils’ Activity: Pupils copy the notes carefully into their notebooks.
Learning Point: Water cycle notes
Step 9: Conclusion
Time: 2 minutes
Teaching Skill: Reinforcement
Teacher’s Activity: The teacher briefly reminds pupils that the water cycle is a continuous process that ensures we always have water on Earth, and rain is a vital part of this cycle. The teacher praises their participation and concludes the lesson.
Pupils’ Activity: Pupils listen and acknowledge the conclusion of the lesson.
Learning Point: Water cycle importance
Continuous Assessment/Further Study
Type: Homework
Instruction: Answer the following questions in your notebook:
- Define evaporation in your own words.
- List the five main stages of the water cycle.
- Why is the water cycle important for life on Earth?
- Find out what happens to rainwater after it falls on the ground.
Lesson Keywords
- Water Cycle – The continuous movement of water on, above, and below the Earth’s surface.
- Evaporation – The process where liquid water turns into water vapour (gas) due to heat.
- Condensation – The process where water vapour cools and turns back into liquid water droplets.
- Cloud Formation – The gathering of tiny water droplets or ice crystals in the sky.
- Precipitation – Water falling from the atmosphere to the Earth’s surface, like rain, snow, or hail.
- Collection – Water gathering in oceans, rivers, lakes, and underground after precipitation.
- Rain Formation – The process by which water droplets in clouds grow large enough to fall as rain.
Differentiation
For slower learners: Provide pre-drawn water cycle diagrams for them to label. Use simpler language and repeat key terms frequently. Pair them with faster learners for the drawing activity.
For faster learners: Challenge them to explain the water cycle to a partner without looking at the diagram. Ask them to research other forms of precipitation apart from rain.
Suggested Lesson Videos
For visual reinforcement, search on YouTube for:
water cycle for kids primary 4 nigeria
Teacher Guide for Using This Lesson Plan
Before the lesson, ensure all materials for the demonstration are ready and safe to use. Prepare a clear, colourful diagram or a short, age-appropriate video on the water cycle. During the demonstration, ensure all pupils can observe clearly and maintain a safe distance from the heat source. Guide the pupils through each stage of the water cycle, linking the demonstration to the natural process. When pupils are drawing, encourage creativity but ensure accuracy in labelling the stages. Allow pupils to copy the Board Summary notes after the evaluation to consolidate their learning. Check their understanding frequently through questions and provide immediate feedback.


Community Join the conversation Open discussion +