

Class: Pre-School Level 4
Term: Second Term
Week: 4
Age: 5 years
Duration: 30 minutes
Subject: Basic Science and Technology
Curriculum Theme: Basic Science and Technology
Previous Lesson: Identifying different types of plants and animals in our environment.
Topic: LIVING THINGS: MEANING AND CHARACTERISTICS
Subject Matter: LIVING THINGS – Meaning of living things. – Characteristics of living things. Weekly focus: Living Things: Meaning and Characteristics.
Specific Objectives
By the end of the lesson, pupils should be able to:
Cognitive Domain
- Define living and non-living things in simple terms.
- Identify and name examples of living things.
- Identify and name examples of non-living things.
- State at least two characteristics of living things.
Affective Domain
- Show curiosity about the world around them.
- Appreciate the differences between living and non-living things.
Psychomotor Domain
- Point to living and non-living things when asked.
- Sort pictures or objects into “living” and “non-living” groups.
Social Domain
- Participate in group discussions about living and non-living things.
- Take turns mentioning examples.
Reference Materials
- NAPPS National Unified Teaching Scheme for Pre-School Level 4.
- Early Childhood Care and Education curriculum resources.
- Relevant Basic Science and Technology textbooks for early years.
Instructional Materials
- Samples of living things: a small potted plant, a toy animal, a picture of a child.
- Samples of non-living things: a stone, a pencil, a toy car, a plastic cup.
- Charts showing pictures of various living and non-living things.
- Flashcards with images of living and non-living things.
Rationale for the Lesson
This lesson helps 5-year-old pupils understand the fundamental differences between living and non-living things in their environment. It builds their observation skills and helps them classify objects, which is a key scientific concept. Understanding these differences helps children make sense of the world around them and appreciate life.
Prerequisite/Previous Knowledge
Pupils can already identify common objects, animals, and plants in their surroundings. They have a basic understanding of what it means for something to move or grow.
Lesson Content/Board Summary
LIVING THINGS: MEANING AND CHARACTERISTICS
What are Living Things?
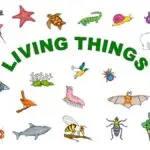
Living things are things that can grow, eat, move, breathe, and have babies. They need food, water, and air to live.
Examples of Living Things
- Humans (man, woman, boy, girl)
- Animals (dog, cat, bird, fish)
- Plants (tree, flower, grass)
- Insects (ant, butterfly)
What are Non-Living Things?
Non-living things are things that cannot grow, eat, move on their own, breathe, or have babies. They do not need food, water, or air.
Examples of Non-Living Things
- Stone
- Desk
- Car
- Glass
- Pencil
- Book
- Chair
Characteristics of Living Things
Living things can:
- Grow: A baby grows into a child, a seedling grows into a plant.
- Eat: Humans and animals eat food; plants make their own food.
- Move: Animals walk, run, fly; plants turn towards the sun.
- Breathe: Humans and animals breathe air.
- Have babies: Humans have children, animals have young ones, plants produce seeds.
- Feel/Respond: Living things react to touch, light, or sound.
Non-living things cannot do any of these things on their own.
Key Words
- Living: Things that can grow, eat, and move.
- Non-living: Things that cannot grow, eat, or move on their own.
- Grow: To get bigger.
- Eat: To take in food.
- Move: To change position.
What the Teacher Should Show or Draw
- Display a real potted plant and a real stone.
- Show pictures of a baby growing into a child.
- Draw simple stick figures showing movement (running, jumping).
- Show charts with clear images of various living and non-living items.
Living and Non-Living Song
Tune: “Twinkle, Twinkle Little Star”
Lyrics:
Living things can grow and grow,
Living things can move and go.
They can eat and breathe the air,
Living things are everywhere!
Non-living things just stay the same,
They don’t play a growing game.
Actions:
- “Grow and grow”: Start crouched, slowly stand up and stretch arms high.
- “Move and go”: Wiggle body, then march in place.
- “Eat and breathe the air”: Pretend to eat, then take a deep breath.
- “Everywhere”: Point around the room.
- “Stay the same”: Stand still like a statue.
- “Growing game”: Shake head “no.”
How to use the rhyme: Sing the song together with actions to reinforce the main characteristics of living and non-living things. Repeat several times.
Watch and Learn
The teacher will show a short educational video about living and non-living things to further illustrate the concepts.
Teaching Methods/Instructional Techniques
Play-based Learning, Demonstration, Guided Practice, Songs and Rhymes, Picture Talk, Question and Answer, Manipulation of Objects, Repetition, Practical Activity.
Instructional Procedures
Step 1: Introduction
Time: 3 minutes
Teaching Skill: Engagement/Recall
Teacher’s Activity: The teacher greets the pupils and asks them to look around the classroom. “What do you see around you? What can you touch?” The teacher holds up a toy animal and a stone. “Which one do you think can grow? Which one can eat?”
Pupils’ Activity: Pupils greet the teacher, look around, and respond to the questions by pointing or giving short answers.
Learning Point: Pupils are engaged and begin to think about objects in their environment.
Step 2: Introducing Living Things
Time: 5 minutes
Teaching Skill: Explanation/Demonstration
Teacher’s Activity: The teacher explains that some things are alive, like us! “Things that are alive are called living things. Living things can grow, eat, move, breathe, and have babies.” The teacher shows a real plant, a toy animal, and a picture of a child. “Look, this plant is growing! This animal can move! You are growing!”
Pupils’ Activity: Pupils listen, observe the real objects and pictures, and repeat “living things” after the teacher. They point to themselves as living things.
Learning Point: Pupils understand the simple meaning of living things and see examples.
Step 3: Introducing Non-Living Things
Time: 4 minutes
Teaching Skill: Explanation/Comparison
Teacher’s Activity: The teacher then introduces non-living things. “Some things are not alive. They are called non-living things. Non-living things cannot grow, eat, move on their own, or have babies.” The teacher shows a stone, a desk, and a toy car. “Can this stone eat? Can this desk walk? No, because they are non-living.”
Pupils’ Activity: Pupils listen, observe the non-living objects, and repeat “non-living things.” They shake their heads “no” when asked if non-living things can eat or walk.
Learning Point: Pupils understand the simple meaning of non-living things and see examples.
Step 4: Discussing Characteristics of Living Things
Time: 6 minutes
Teaching Skill: Questioning/Reinforcement
Teacher’s Activity: The teacher uses charts and flashcards to discuss the characteristics. “Look at this picture of a baby, then a child, then an adult. What is happening? (Grow). Look at this boy eating yam. What is he doing? (Eat). See this bird flying. What is it doing? (Move). We breathe air. Animals also breathe.” The teacher asks pupils to demonstrate simple actions for each characteristic.
Pupils’ Activity: Pupils observe the charts, answer questions, and demonstrate actions like pretending to eat, stretching up to grow, and wiggling to move.
Learning Point: Pupils connect actions to the characteristics of living things.
Step 5: Rhyme and Video Reinforcement
Time: 5 minutes
Teaching Skill: Song/Visual Aid
Teacher’s Activity: The teacher leads the pupils in singing the “Living and Non-Living Song” with actions. After the song, the teacher plays the short educational video about living and non-living things.
Pupils’ Activity: Pupils sing the song with actions and watch the video attentively, pointing out living and non-living things they see.
Learning Point: Concepts are reinforced through auditory and visual learning.
Step 6: Practical Sorting Activity
Time: 3 minutes
Teaching Skill: Application/Guided Practice
Teacher’s Activity: The teacher places a mix of living and non-living objects/pictures (e.g., a leaf, a toy car, a picture of a cat, a crayon) on a table. The teacher asks individual pupils to pick an item and say if it is living or non-living, and why.
Pupils’ Activity: Pupils take turns picking an item, identifying it as living or non-living, and giving a simple reason (e.g., “This is a cat, it’s living because it can move and eat.”).
Learning Point: Pupils apply their understanding by classifying objects.
Step 7: Evaluation/Review
Time: 4 minutes
Teaching Skill: Questioning/Assessment
Teacher’s Activity: The teacher checks pupils’ understanding through short questions and practical tasks.
- “Can you point to a living thing in our classroom?”
- “Can you point to a non-living thing?”
- “Tell me one thing living things can do.”
- “Is a stone living or non-living? Why?”
Pupils’ Activity: Pupils respond orally and demonstrate the required skill where appropriate.
Learning Point: Pupils demonstrate understanding of the lesson.
Step 8: Conclusion
Time: 1 minute
Teaching Skill: Summarisation
Teacher’s Activity: The teacher praises the pupils for their participation and reminds them that the world is full of amazing living and non-living things. “Always remember, living things grow, eat, and move, but non-living things don’t!”
Pupils’ Activity: Pupils listen and repeat the summary statement.
Learning Point: Pupils consolidate their learning and end the lesson on a positive note.
Lesson Keywords
- Living: Things that are alive and can grow, eat, and move.
- Non-living: Things that are not alive and cannot grow, eat, or move on their own.
- Grow: To get bigger or develop.
- Eat: To take in food for energy.
- Move: To change position from one place to another.
Differentiation
- Support: For pupils who are struggling, provide larger, more distinct pictures. Use hand-over-hand guidance for pointing. Focus on just two key characteristics (e.g., “grow” and “move”). Allow them to simply point to examples without explaining why.
- Extension: For pupils who grasp the concept quickly, ask them to name more examples of living and non-living things from their homes. Challenge them to explain more characteristics (e.g., “What about having babies?”).
Note for teachers using this lesson plan
Before the lesson, gather a good variety of real objects and clear pictures for both living and non-living things. The more concrete examples you provide, the better 5-year-olds will understand. Emphasize the actions living things can do (grow, eat, move) using simple gestures and repetition. Encourage pupils to use their own bodies to demonstrate these actions. Pay attention to pupils’ responses during the sorting activity to gauge their understanding. Some children might confuse movement (like a car moving) with being alive; clarify that non-living things need an external force to move, while living things move on their own. The song and video are crucial for reinforcement and engagement.

Community Join the conversation Open discussion +