

Note for teachers using this lesson plan
This lesson plan guides pupils to identify and understand the colours and meanings of traffic lights and common road markings. Prepare visual aids like pictures of traffic lights and road signs to make the concepts concrete. Emphasise road safety throughout the lesson. By the end, pupils should be able to identify these colours, state their meanings, and understand their importance for safety on the road.
Class: Primary 1
Term: First Term
Week: 10
Age: 6 years
Duration: 45 minutes
Subject: Basic Science
Curriculum Theme: Our Environment
Focal competence: Identifying and classifying things in the environment according to shape
Key competencies/values: Communication; Creativity
Skills:
- Identifying colours of road markings and traffic lights
- Drawing and colouring a road traffic light
Previous Lesson: Colours, Their Names and Sorting Materials by Colour
Topic: Colour Identification: Traffic Lights And Road Markings
Subject Matter: Colours, meanings of traffic lights, familiar road markings/sign colours, drawing, colouring a traffic light
Specific Objectives
By the end of the lesson, pupils should be able to:
Cognitive Domain
- Identify the colours of a traffic light.
- State the meaning of the colours of a road traffic light.
- Identify selected road markings and name their colours.
- Explain why traffic-light colours and coloured road markings/signs are used.
Affective Domain
- Appreciate the importance of obeying traffic light signals and road markings for safety.
Psychomotor Domain
- Draw and colour a road traffic light.
Reference Materials
The following resources were used in planning this lesson:
- 2025 Revised 9 Years Basic Education Curriculum
- Relevant State Unified Scheme of Work
- Basic Science for Primary 1 textbook
- The HeadTeacher Scheme of work
Instructional Materials
The teacher will teach this lesson with the aid of:
- Objects of different shapes (though the lesson focuses on colours, these can be used for the focal competence if desired)
- Shape charts/cards (as per curriculum, but lesson focus is colours)
- Pictures of traffic lights
- Pictures of common road markings (e.g., zebra crossing, white lines, yellow lines)
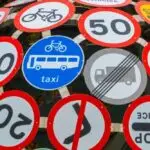
- Pictures of common road signs (e.g., Stop sign, Warning sign)
- Drawing paper
- Crayons/Colour pencils
Rationale for the Lesson
Understanding the colours and meanings of traffic lights and road markings is essential for pupils’ safety as they move around their environment. This knowledge helps them to navigate roads safely as pedestrians and prepares them to be responsible road users in the future. It also helps them to understand how their environment is organised for safety.
Prerequisite/Previous Knowledge
Pupils can identify basic colours like red, yellow, and green.
Lesson Content/Board Summary
Colour Identification: Traffic Lights And Road Markings
What is a Traffic Light?
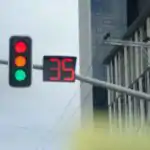
A traffic light is a set of coloured lights used to control the movement of vehicles and people on the road. It helps to keep everyone safe by telling them when to stop, get ready, or go.
Colours of a Traffic Light and Their Meanings
Traffic lights have three important colours, and each colour tells us what to do:
- Red Light: This means STOP. When the red light is on, vehicles must stop, and people should not cross the road.
- Amber/Yellow Light: This means GET READY. When the yellow light is on, drivers should get ready to stop or get ready to go. People should be careful.
- Green Light: This means GO. When the green light is on, vehicles can move, and people can cross the road if it is safe.
What are Road Markings and Signs?
Road markings are lines, words, or pictures painted on the road surface. Road signs are boards placed by the side of the road. Both of them tell drivers and people walking what to do to stay safe.
Common Road Marking/Sign Colours and Their Meanings
Different colours used for road markings and signs have different meanings:
- White Lines: These lines are often painted on the road to separate lanes of traffic, show the edges of the road, or mark where people can cross (like a zebra crossing).
- Yellow Lines: These lines usually mean no parking or no stopping in that area.
- Red Signs: Signs that are red, like a “STOP” sign, mean you must stop completely.
- Blue Signs: These signs usually give information, like directions to a place.
- Green Signs: These signs often show directions to different towns or places.
- Yellow and Black Signs: These signs are used to warn about dangers ahead, such as a school nearby or a sharp bend in the road.
Importance of Traffic Lights and Road Markings
Traffic lights and road markings are very important for everyone on the road:
- They help to prevent accidents by controlling movement.
- They guide drivers and people walking to use the road safely.
- They make the roads organised and orderly.
Teaching Methods/Instructional Techniques
Discussion, Demonstration, Guided Practice, Question and Answer, Explanation, Observation, Practical Activity
Instructional Procedures
Step 1: Introduction
Time: 5 minutes
Teaching Skill: Questioning/Engagement
Teacher’s Activity: The teacher greets the pupils and asks them to name some colours they know. The teacher then asks if they have seen any of these colours on the road or at a junction. The teacher introduces the topic: “Colour Identification: Traffic Lights And Road Markings.”
Pupils’ Activity: Pupils respond to the teacher’s questions and listen attentively to the introduction.
Learning Point: Introduction to road colours
Step 2: Identifying Traffic Light Colours
Time: 8 minutes
Teaching Skill: Demonstration/Identification
Teacher’s Activity: The teacher displays pictures of a traffic light and asks pupils to identify the colours they see. The teacher points to each colour (red, amber/yellow, green) and asks pupils to name them.
Pupils’ Activity: Pupils identify and name the colours of the traffic light as pointed out by the teacher.
Learning Point: Traffic light colours
Step 3: Meaning of Red Light
Time: 5 minutes
Teaching Skill: Explanation/Discussion
Teacher’s Activity: The teacher explains the meaning of the red light, demonstrating the “STOP” action. The teacher asks pupils what they should do when they see a red light.
Pupils’ Activity: Pupils listen, repeat the meaning of the red light, and demonstrate the “STOP” action.
Learning Point: Red light meaning
Step 4: Meaning of Amber/Yellow Light
Time: 5 minutes
Teaching Skill: Explanation/Discussion
Teacher’s Activity: The teacher explains the meaning of the amber/yellow light, demonstrating the “GET READY” action. The teacher asks pupils what it means for drivers and people walking.
Pupils’ Activity: Pupils listen, repeat the meaning of the amber/yellow light, and show the “GET READY” action.
Learning Point: Amber/Yellow light meaning
Step 5: Meaning of Green Light
Time: 5 minutes
Teaching Skill: Explanation/Discussion
Teacher’s Activity: The teacher explains the meaning of the green light, demonstrating the “GO” action. The teacher asks pupils what they should do when they see a green light.
Pupils’ Activity: Pupils listen, repeat the meaning of the green light, and demonstrate the “GO” action.
Learning Point: Green light meaning
Step 6: Road Markings and Signs
Time: 7 minutes
Teaching Skill: Observation/Guided Practice
Teacher’s Activity: The teacher displays pictures of common road markings (e.g., white lines, yellow lines, zebra crossing) and signs (e.g., Stop sign, Warning sign). The teacher asks pupils to identify the colours and explains their simple meanings. The teacher then guides pupils to draw and colour a simple traffic light on their drawing paper.
Pupils’ Activity: Pupils observe the pictures, identify colours, listen to explanations, and begin drawing and colouring a traffic light.
Learning Point: Road marking colours and meanings
Step 7: Evaluation/Review
Time: 5 minutes
Teaching Skill: Questioning/Assessment
Teacher’s Activity: The teacher evaluates the learning by asking the following questions:
- Name the three colours of a traffic light.
- What does the red light mean?
- What does the green light mean?
- Mention one colour of a road marking or sign and its meaning.
Pupils’ Activity: Pupils answer orally and in writing.
Learning Point: Understanding traffic light and road sign colours
Step 8: Note-Taking
Time: 4 minutes
Teaching Skill: Guided Writing
Teacher’s Activity: The teacher guides pupils to copy the essential Board Summary notes on traffic light colours and meanings into their notebooks.
Pupils’ Activity: Pupils copy the notes carefully into their notebooks.
Learning Point: Recording lesson notes
Step 9: Conclusion
Time: 1 minute
Teaching Skill: Reinforcement
Teacher’s Activity: The teacher briefly reinforces the importance of knowing and obeying traffic lights and road markings for everyone’s safety on the road. The teacher reminds pupils to always be careful when walking near roads.
Pupils’ Activity: Pupils listen and acknowledge the safety message.
Learning Point: Road safety importance
Continuous Assessment/Further Study
Type: Homework / Practice Exercise
Instruction: Complete the drawing and colouring of the traffic light you started in class. Also, ask an adult at home to tell you about one more road sign they know.
- Draw and colour a traffic light correctly.
- Colour the top light red.
- Colour the middle light yellow/amber.
- Colour the bottom light green.
- Ask an adult to describe one road sign they know.
Lesson Keywords
- Traffic Light – Lights that control cars and people on the road.
- Red – Stop.
- Amber/Yellow – Get ready.
- Green – Go.
- Road Markings – Lines or pictures painted on the road.
- Road Signs – Boards by the road that give information or warnings.
- Safety – Being free from danger.
Differentiation
For slower learners: Provide pre-drawn outlines of traffic lights for them to colour. Focus on identifying only the red and green lights and their meanings. Use flashcards with large, clear images and words. Allow them to practice the actions (stop, go) physically.
For faster learners: Encourage them to draw more complex road signs they might have seen. Ask them to explain why it is dangerous not to obey traffic lights. They can also identify more colours used in road signs (e.g., blue for information, brown for tourist attractions).
Suggested Lesson Videos
For further visual learning, teachers can search on YouTube for: Primary 1 traffic light colours and meanings basic science
Teacher Guide for Using This Lesson Plan
Before the lesson, ensure you have clear pictures or charts of traffic lights and common road markings/signs. You may also bring actual small toy cars or dolls to demonstrate the actions for “stop” and “go” for a more interactive experience. Begin by engaging pupils with questions about their daily observations on the road. When teaching the meanings of the traffic light colours, encourage pupils to perform the corresponding actions (stop, get ready, go) to make the learning memorable. For road markings and signs, focus on very familiar examples like zebra crossings or stop signs. Allow sufficient time for the guided drawing and colouring activity in Step 6. Pupils should copy the Board Summary notes in Step 8 after the main concepts have been taught and understood. During evaluation, observe both oral and written responses to check for understanding. Provide extra support for pupils struggling with colour identification or meaning recall, and offer extension activities for those who grasp the concepts quickly. Emphasise road safety throughout the lesson, linking the colours and meanings directly to staying safe.
Community Join the conversation Open discussion +