

Class: Primary Two
Term: First Term
Subject: Basic Science and Technology
Curriculum Theme: Basic Technology
Previous Lesson: Kneading of Clay
Topic: Preparing a Place for Moulding
Content/Learning Area: Steps in Preparing a Place for moulding, Importance of a Clean and Flat Surface for Moulding, Materials Needed for Preparing the Place for Moulding
Time Allocation: 40 minutes
Performance Objectives
By the end of the lesson, pupils should be able to:
- Cognitive Domain:
- list the steps in preparing a place for moulding.
- Explain the importance of a clean and flat surface for moulding.
- Identify the materials needed for preparing the place for moulding.
- Affective Domain:
- Show gratitude for the importance of readiness in creative activities.
- Psychomotor Domain:
- Prepare a suitable workspace for moulding activities.
- Social Domain:
- Work cooperatively with peers during moulding activities.
Reference materials
- 9 – Years Basic Education Curriculum
- Abuja Educational Resource Center Scheme of Work
- NAPPS national Unified scheme of Work
- Relevant Textbooks
Instructional Materials
To deliver this lesson, the teacher will use the following materials:
- Clay or playdough
- Tables or trays
- Water
- Moulding tools (optional)
- Whiteboard or chart paper
Rationale for the Lesson
This lesson teaches the foundational steps for accomplished moulding, fostering creativity and fine motor skills. A well-prepared workspace ensures a positive and productive moulding experience,laying the groundwork for more complex projects in future lessons.
Prerequisite/Previous Knowledge
The pupils have prior knowledge of materials like clay and playdough.
Lesson Content
preparing a Place for Moulding
Moulding is shaping materials like clay or playdough into different forms. A good workspace makes moulding easier and more fun.
what is Moulding?
Moulding is shaping a material, like clay or playdough, into a desired shape using hands or tools to create designs.
Steps in Preparing a Place for Moulding
Preparing a workspace for moulding involves several key steps to ensure a smooth and enjoyable experience. The following are the steps:
- Choose a Location: Pick a clean, flat surface like a table or tray.
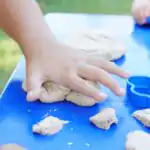
- Spread Clay: Spread a thin layer of clay on the surface for a stable base.
- Wet the Clay: Add a little water to make the clay easier to shape.
- Start Moulding: Begin shaping the clay into different forms.
Teaching Methods
To deliver this lesson, the teacher will adopt the following methods: Demonstration,Explanation,Question and Answer,and Guided practice.
Instructional Procedures
To deliver this lesson, the teacher will adopt the following steps:
step 1: Introduction (Set Induction)
Time: 5 minutes
Teaching Skill: Questioning
teacher’s Activity: Asks pupils about their experiences with moulding and introduces the topic of preparing a workspace.
Pupils’ activity: Share their experiences and listen attentively to the introduction.
Step 2: Explanation of Key Concepts
Time: 10 minutes
Teaching Skill: Explanation
Teacher’s Activity: Explains the importance of a clean and flat surface and the steps involved in preparing the workspace.
pupils’ Activity: Listen attentively and ask clarifying questions.
Step 3: Demonstration/Guided Practice
Time: 15 minutes
Teaching Skill: Demonstration
Teacher’s Activity: Demonstrates the steps involved in preparing a workspace for moulding, including choosing a location, spreading clay, and wetting the clay.
Pupils’ Activity: Observe the demonstration and participate in guided practice under the teacher’s supervision.
Step 4: Independent Practice
Time: 5 minutes
Teaching Skill: Monitoring
Teacher’s Activity: Supervises pupils as they independently prepare their workspaces for moulding.
Pupils’ Activity: Independently prepare their workspaces, following the steps demonstrated by the teacher.
Step 5: Note-Taking
Time: 2 minutes
Teaching Skill: Note-Taking
Teacher’s Activity: Guides pupils in taking notes on the key steps involved in preparing a place for moulding.
pupils’ Activity: Take notes on the key steps.
Step 6: Evaluation/Review
Time: 3 minutes
Teaching Skill: Questioning
Teacher’s Activity: Asks review questions to assess pupils’ understanding.
Pupils’ Activity: Answer the review questions.
Objective-aligned checks:
- list the steps in preparing a place for moulding.
- Explain the importance of a clean and flat surface for moulding.
- Identify the materials needed for preparing the place for moulding.
Step 7: Conclusion
Time: –
Teaching Skill: Summarizing
Teacher’s Activity: Summarizes the key points of the lesson.
Pupils’ Activity: Listen to the summary and ask any remaining questions.
Lesson Keywords
- Moulding – Shaping materials like clay into different forms.
- Workspace – A designated area for carrying out tasks.
- Clay – A type of soil that is soft when wet and hard when dry.
- Playdough – A soft, pliable material used for modelling.
- Surface – The outer boundary of an object.
Lesson Evaluation
To evaluate the learning, the teacher asks pupils to:
- What are the steps to prepare a place for moulding?
- Why is a clean, flat surface significant for moulding?
- What materials do we need to prepare a place for moulding?
- Give examples of shapes you can make with clay.
- Why do we wet the clay before moulding?
Assignment/Homework
- Find different types of clay or playdough available in your environment.
- Prepare a small workspace at home and practice moulding simple shapes.
- List three reasons why it is important to have a clean workspace before starting a moulding activity.
Differentiation
- For slower learners: Provide one-on-one assistance and simplified instructions.
- For advanced learners: Challenge them to create more complex shapes and designs.
- For visual/auditory/kinesthetic learners: Use visual aids, verbal explanations, and hands-on activities to cater to different learning styles.
Note for Teachers
Ensure that all materials are readily available before the lesson begins. Supervise pupils closely during the practical activities to ensure safety and provide guidance as needed. Encourage creativity and exploration during the moulding process.

Community Join the conversation Open discussion +