

Class: Primary Two
Term: Second Term
Subject: basic Science and technology
Curriculum Theme: Computer Studies
Previous Lesson:
Topic: Features Of A Keyboard
Content/Learning Area: What is a Keyboard?, some of the main features of a keyboard include:
time Allocation: 40 minutes
Performance objectives
By the end of the lesson, pupils should be able to:
- Cognitive domain:
1. Identify at least four features of a keyboard.
2. Explain the purpose of a keyboard.
- Affective Domain:
1.Show interest in learning about computer components.
- Psychomotor Domain:
1. Demonstrate the ability to identify keys on a keyboard.
- Social Domain:
1. Participate actively in class discussions.
Reference Materials
- 9 – Years Basic education Curriculum
- Abuja Educational Resource Center Scheme of Work
- NAPPS National Unified Scheme of Work
- Relevant textbooks
Instructional Materials
To deliver this lesson,the teacher will use the following materials: A keyboard,Pictures of keyboards,Whiteboard or chart paper,Markers.
Rationale for the lesson
Understanding the features of a keyboard is basic for using computers effectively. This lesson lays the groundwork for future lessons on typing skills and computer literacy.
Prerequisite/Previous Knowledge
Pupils have some basic familiarity with computers and their uses.
Lesson Content
What is a Keyboard?
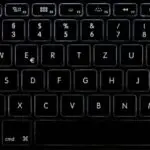
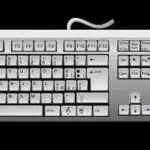
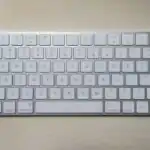
A keyboard is a device with many keys used to input details into a computer. It acts as a bridge between our thoughts and the digital world. Think of it like a typewriter for your computer!
Some of the main features of a keyboard include:
Keyboards have several features that make them useful for inputting information.
the following are some of the main features of a keyboard:
- Rectangular Shape: Keyboards are usually rectangular, like a book or a piece of paper.
- many Keys: They have lots of keys, each with a job. These keys are arranged in rows and columns.
- Letters and Numbers: Keyboards have letters and numbers, so we can type words and numbers.
- Small Buttons: The keys are small buttons we press to type.
- Different Colors: Some keys have different colors to help us find them easily. The space bar is often a different colour.
- Used for Typing: We use keyboards to type words, numbers, and symbols into a computer.
- Function Keys: These keys (F1, F2, etc.) perform specific functions depending on the program being used.
- Special Keys: These include keys like Shift, Ctrl, Alt, Tab, and Caps Lock, which modify the function of other keys or perform special actions.
Teaching Methods
To deliver this lesson, the teacher will adopt the following methods: Discussion, Presentation, Question and Answer.
Instructional Procedures
To deliver this lesson, the teacher will adopt the following steps:
Step 1: introduction
Time: 5 minutes
Teaching Skill: Set Induction
Teacher’s Activity: Ask pupils what they know about computers and how we use them to input information.
Pupils’ activity: Respond to the teacher’s questions and participate in the discussion.
Step 2: Description of Key Concepts
Time: 10 minutes
Teaching Skill: Description, Demonstration
Teacher’s Activity: Introduce the keyboard and explain its purpose. Show a real keyboard and point out its features.
Pupils’ Activity: Listen attentively and observe the demonstration.
Step 3: Demonstration/Guided Practice
Time: 10 minutes
teaching Skill: Guided Practice
Teacher’s Activity: Guide pupils to identify different features of the keyboard, such as the keys, their arrangement, and different colors.
Pupils’ Activity: Participate in the guided practice and identify the features.
Step 4: Autonomous Practice
Time: 5 minutes
Teaching Skill: Observation
Teacher’s Activity: Observe pupils as they independently identify keyboard features.
Pupils’ Activity: Independently identify keyboard features.
Step 5: Note-Taking
Time: 5 minutes
Teaching Skill: Note-Taking
Teacher’s Activity: Guide pupils to take notes on the main features of a keyboard.Pupils’ Activity: Take notes on the main features of a keyboard.
Step 6: Evaluation/Review
Time: 5 minutes
Teaching Skill: Questioning
Teacher’s Activity: Ask evaluation questions to assess understanding.
Pupils’ Activity: Answer the evaluation questions.
Objective-aligned checks:
- Identify at least four features of a keyboard.
- Explain the purpose of a keyboard.
- Show interest in learning about computer components.
Step 7: Conclusion
Time: 5 minutes
Teaching Skill: Summarizing
Teacher’s Activity: Summarize the main features of a keyboard and encourage pupils to practice using a keyboard at home or in the computer lab.Pupils’ Activity: Listen to the summary and ask any remaining questions.
Lesson Keywords
- Keyboard – A device with keys used to input information into a computer.
- Keys – Buttons on a keyboard that are pressed to type letters, numbers, or symbols.
- Input – The act of entering information into a computer.
- Features – Distinctive attributes or characteristics of a keyboard.
- Typing – The process of writing by pressing keys on a keyboard.
Lesson Evaluation
To evaluate the learning,the teacher asks pupils to:
- What shape is a keyboard?
- What can you type on a keyboard?
- list three features of a keyboard.
- Why is a keyboard critically important for using a computer?
- Name some keys on a keyboard.
Assignment/Homework
- Draw a keyboard and label at least five keys.
- Write a short paragraph explaining what a keyboard is used for.
- List three places were you can find a keyboard.
Differentiation
- For slower learners: Provide one-on-one assistance and use simpler language.
- For advanced learners: Encourage them to explore different types of keyboards and their functions.
- For visual/auditory/kinesthetic learners: Use visual aids, verbal explanations, and hands-on activities to cater to different learning styles.
Note for Teachers
Ensure that each pupil has the prospect to interact with a physical keyboard during the lesson. Encourage active participation and provide constructive feedback.

Community 1 comment Open discussion +