

Class: Senior Secondary School 1 (SS1 / SSS 1)
Term: 2nd Term
Week: 1
Age: 15 years
Duration: 45 minutes
Subject: Garment Making
Curriculum Theme: Trade
Previous Lesson: .
Topic: THE SEWING MACHINE
Subject Matter: Types of sewing machine, Uses of sewing machines, Functions of machine parts
Specific Objectives
By the end of the lesson, pupils should be able to:
Cognitive Domain:
- Identify different types of sewing machines.
- State at least three uses of a sewing machine.
- Describe the functions of key parts of a sewing machine.
Affective Domain:
- Appreciate the importance of the sewing machine in garment production.
- Develop an interest in learning how to operate a sewing machine.
Psychomotor Domain:
- Point out and name various parts of a sewing machine.
- Demonstrate basic handling of a sewing machine.
Social Domain:
- Collaborate with peers to identify sewing machine parts.
Reference Materials
The following resources were used in planning this lesson:
- 9 Years Basic Education Curriculum for Home Economics (Senior Secondary).
- State Unified Scheme of Work for Garment Making (SSS 1).
- Home Economics for Senior Secondary Schools, Book 1.
- https://www.teachyourselfhowtosew.com/sewing-machine-parts-and-their-functions/
- https://www.singer.com/types-of-sewing-machines
Instructional Materials
The teacher will teach this lesson with the aid of:
- Charts showing different types of sewing machines.
- A diagram illustrating the parts of a sewing machine.
- An actual manual sewing machine.
- An actual electric sewing machine (if available).
Rationale for the Lesson
Understanding the sewing machine is important because it is a fundamental tool in garment making. This lesson helps pupils to identify and understand how different sewing machines work, which is essential for developing practical skills in sewing and creating various garments.
Prerequisite/Previous Knowledge
Pupils may have seen sewing machines at home or in tailoring shops and might have basic knowledge of simple stitching.
Lesson Content/Board Summary
THE SEWING MACHINE
Types of Sewing Machines
A sewing machine is a machine used to stitch fabric and other materials together with thread.
The following are types of sewing machines:
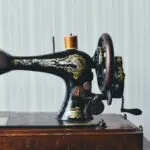
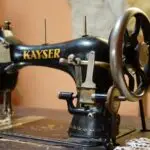
- Manual/Hand-operated Sewing Machine: Operated by turning a hand wheel. It is simple to use and does not require electricity.
- Treadle Sewing Machine: Operated by foot pedals that move a large wheel, which in turn powers the needle. It also does not require electricity.
- Electric Sewing Machine: Powered by an electric motor, making it faster and more efficient. It often has various stitch options.
- Industrial Sewing Machine: Designed for heavy-duty and continuous use in factories. They are specialized for specific tasks and are very fast.
Uses of Sewing Machines
A sewing machine is used for many purposes, including:
- Joining pieces of fabric together to create garments and other textile products.
- Making various types of seams (e.g., plain, French, lapped).
- Creating decorative stitches and embroidery.
- Attaching zippers, buttons, and buttonholes.
- Hemming edges of fabrics.
- Repairing clothes and other textile items.
Functions of Key Sewing Machine Parts
Each part of a sewing machine performs a specific function for its operation:
- Needle: Carries the upper thread through the fabric to form stitches.
- Bobbin: Holds the lower thread, which interlocks with the upper thread to form a stitch.
- Presser Foot: Holds the fabric firmly in place against the feed dog while sewing.
- Tension Disc: Regulates the tightness of the upper thread to ensure balanced stitches.
- Thread Guide: Guides the upper thread from the spool to the needle.
- Balance Wheel (Hand Wheel): Used to manually raise and lower the needle and take-up lever.
- Stitch Regulator/Length Dial: Controls the length of the stitches.
- Feed Dog: Moves the fabric forward under the presser foot during sewing.
- Spool Pin: Holds the spool of upper thread.
- Take-up Lever: Pulls the thread from the spool and feeds it to the needle, also tightening the stitch.
Teaching Methods/Instructional Techniques
Discussion, Lecture, Demonstration, Question and Answer, Visual Aids
Instructional Procedures
Step 1: Introduction
Time: 5 minutes
Teaching Skill: Set Induction
Teacher’s Activity: The teacher greets the pupils and asks them if they have ever seen a sewing machine or if anyone knows what it is used for. The teacher then introduces the topic: “The Sewing Machine.”
Pupils’ Activity: Pupils respond to the teacher’s questions and listen attentively to the introduction.
Learning Point: Pupils recall prior knowledge and are introduced to the lesson topic.
Step 2: Types of Sewing Machines
Time: 7 minutes
Teaching Skill: Explanation/Illustration
Teacher’s Activity: The teacher explains what a sewing machine is and describes the different types of sewing machines, using charts and actual machines (if available) for illustration. The teacher will focus on manual, treadle, and electric machines.
Pupils’ Activity: Pupils listen, observe the charts and machines, and ask questions for clarification. They take notes on the types of machines.
Learning Point: Pupils identify and understand various types of sewing machines.
Step 3: Uses of Sewing Machines
Time: 5 minutes
Teaching Skill: Discussion/Elicitation
Teacher’s Activity: The teacher leads a discussion on the various uses of a sewing machine, encouraging pupils to contribute ideas based on their observations or experiences. The teacher then summarizes the key uses.
Pupils’ Activity: Pupils participate in the discussion, sharing ideas and noting down the uses of sewing machines.
Learning Point: Pupils state and explain the uses of a sewing machine.
Step 4: Functions of Key Sewing Machine Parts
Time: 10 minutes
Teaching Skill: Demonstration/Explanation
Teacher’s Activity: Using a diagram and an actual sewing machine, the teacher points out and names the key parts of the machine (e.g., needle, bobbin, presser foot, tension disc, thread guide, balance wheel, stitch regulator, feed dog) and explains the function of each part.
Pupils’ Activity: Pupils observe the demonstration, identify the parts, listen to the explanations, and ask questions. They take notes on the functions of each part.
Learning Point: Pupils identify and describe the functions of different sewing machine parts.
Step 5: Practical Demonstration
Time: 5 minutes
Teaching Skill: Practical Demonstration
Teacher’s Activity: The teacher briefly demonstrates how to thread a simple manual sewing machine and make a few stitches, emphasizing the coordination of parts.
Pupils’ Activity: Pupils observe the teacher’s demonstration carefully.
Learning Point: Pupils see the sewing machine in operation and how its parts work together.
Step 6: Pupil Practice/Identification
Time: 5 minutes
Teaching Skill: Guided Practice
Teacher’s Activity: The teacher guides pupils to identify the parts of the sewing machine on the charts and the actual machine, asking individual pupils to name a part and state its function.
Pupils’ Activity: Pupils take turns identifying parts of the sewing machine and stating their functions, with assistance from the teacher and peers.
Learning Point: Pupils practice identifying and naming sewing machine parts.
Step 7: Evaluation/Review
Time: 5 minutes
Teaching Skill: Questioning/Assessment
Teacher’s Activity: The teacher evaluates the learning by asking the following questions:
- Define a sewing machine.
- Mention two types of sewing machines.
- State three uses of a sewing machine.
- Identify and state the function of any two parts of a sewing machine.
Pupils’ Activity: Pupils answer orally and in writing.
Learning Point: Pupils demonstrate understanding of the lesson.
Step 8: Conclusion
Time: 3 minutes
Teaching Skill: Summarization
Teacher’s Activity: The teacher summarizes the lesson by briefly recapping the main points: types of sewing machines, their uses, and the functions of their parts. The teacher then assigns homework: “Draw a simple diagram of a sewing machine and label five of its parts.”
Pupils’ Activity: Pupils listen to the summary and copy the homework assignment.
Learning Point: Pupils consolidate their learning and receive an assignment for further practice.
Lesson Keywords
- Sewing Machine – A machine used to stitch fabric and other materials together with thread.
- Manual Sewing Machine – A sewing machine operated by hand.
- Treadle Sewing Machine – A sewing machine operated by foot pedals.
- Electric Sewing Machine – A sewing machine powered by an electric motor.
- Needle – The part that carries the thread through the fabric.
- Bobbin – The spool that holds the lower thread.
- Presser Foot – Holds the fabric down while sewing.
- Feed Dog – Moves the fabric under the needle.
Differentiation
For visual learners, the teacher will use detailed charts and diagrams of sewing machines. For pupils who grasp concepts quickly, they can be encouraged to identify more complex parts or explain the working mechanism. For those needing more support, the teacher will provide one-on-one guidance during the identification of parts and allow them to work with a partner.
Note for teachers using this lesson plan
Teachers should ensure that actual sewing machines (at least one manual and one electric if possible) are available for demonstration. If not, high-quality diagrams and videos should be used. Emphasize safety precautions when handling the machine. Encourage pupils to actively participate by touching and identifying parts where appropriate and safe.

Community Join the conversation Open discussion +