

Class: Senior Secondary School 1 (SS1, SS 1, SSS1, SSS 1)
Term: 2nd Term
Week: 5
Age: 15 years
Duration: 45 minutes
Subject: Visual Art
Curriculum Theme: Visual Art
Previous Lesson: Shading Techniques: Hatching, Cross-Hatching, Pointillism and Blurring.
Topic: Still Life Drawing
Subject Matter: Composition of inanimate objects, proportion in still life drawing, texture in drawing, shading in still life, line qualities and directions, shapes and forms, simple perspective
Specific Objectives
By the end of the lesson, pupils should be able to:
Cognitive Domain:
- Define still life drawing.
- State the meaning of composition in still life.
- Explain proportion in still life drawing.
- List ways of showing texture and shading in still life drawing.
- State simple perspective rules used in still life drawing.
Affective Domain:
- Show interest in careful observation of inanimate objects before drawing.
- Appreciate neat drawings with correct proportion and shading.
- Demonstrate patience and concentration during the practical exercise.
Psychomotor Domain:
- Arrange or observe arranged inanimate objects and sketch their outlines accurately.
- Apply line qualities and directions to show edges and details.
- Shade and add texture to make the still life drawing look realistic.
Social Domain:
- Work in groups to arrange objects and agree on a good composition.
- Share drawing materials and work space responsibly.
- Discuss drawings and give simple feedback politely.
Reference Materials
The following resources were used in planning this lesson:
- 9 Years Basic Education Curriculum
- State Unified Scheme of Work
- Recommended textbook on Fine Art/Visual Art for Senior Secondary Schools
- Tate: Still Life
- The Met: Still Life Painting
- Encyclopaedia Britannica: Still Life
Instructional Materials
The teacher will teach this lesson with the aid of:
- Table and chair for arranging objects
- Cups and flask (and any other simple inanimate objects available)
- Pencils, erasers, sharpeners
- Drawing paper
- Cardboard as drawing support
- Light source (window light or lamp) to create visible shadows
Rationale for the Lesson
This lesson helps pupils learn how to draw everyday objects accurately by observing shape, proportion, and light. It also improves their ability to apply shading and texture, which is useful for school art practicals and design work.
Prerequisite/Previous Knowledge
Pupils have learnt basic drawing skills, line patterns, and shading techniques.
Lesson Content/Board Summary
STILL LIFE DRAWING
Meaning of Still Life Drawing
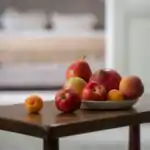
Still life drawing is the drawing of inanimate objects arranged together, such as cups, bottles, fruits, and tools, from direct observation.
Composition of Inanimate Objects
Composition is the arrangement of objects to make the drawing balanced and clear.
The following are guidelines for good still life composition:
- Arrange objects with a clear main object (centre of interest).
- Use overlapping to show depth and relationship between objects.
- Avoid scattering objects too far apart.
- Balance sizes and positions so one side is not too heavy.
- Place objects on a stable surface and use a single light direction.
Proportion in Still Life Drawing
Proportion is the correct size relationship between parts of one object and between different objects in a drawing.
The following are ways to achieve correct proportion in still life drawing:
- Measure with pencil using thumb and arm as a guide.
- Compare heights and widths of objects before drawing.
- Start with light outline and correct errors early.
- Use simple shapes first before adding details.
Shapes and Forms in Still Life
Shapes are flat outlines while forms show three-dimensional objects such as cylinders, cones, and spheres.
The following are common shapes and forms found in still life objects:
- Circle and cylinder (cup, flask)
- Oval and cylinder (bottle)
- Rectangle and cuboid (box, book)
- Sphere (ball, orange)
Line Qualities and Directions
Line quality refers to how a line looks, such as thick, thin, light, or heavy, while direction refers to the movement of the line.
The following are ways to use line qualities and directions in still life drawing:
- Use light lines for guide outlines and heavy lines for final edges.
- Use curved lines to show round objects and straight lines for flat edges.
- Use controlled short lines for details and texture.
- Follow the form direction when drawing curves and contours.
Texture in Still Life Drawing
Texture is the surface appearance of an object, such as smooth, rough, shiny, or dull.
The following are ways to show texture in still life drawing:
- Use smooth shading for smooth objects (cup, flask).
- Use hatching or cross-hatching for rough surfaces.
- Use short broken lines for grainy surfaces.
- Use highlights and sharp contrasts for shiny objects.
Shading in Still Life Drawing
Shading is the use of light and dark tones to show form and shadow in a drawing.
The following are parts of shading in still life drawing:
- Highlight (brightest area where light hits strongly)
- Mid-tone (middle value between light and dark)
- Core shadow (darkest part on the object itself)
- Cast shadow (shadow thrown on the table or nearby object)
- Reflected light (slight light seen on the shadow side)
Simple Perspective in Still Life
Simple perspective is the method used to show depth by making objects appear smaller as they move farther away.
The following are simple perspective rules used in still life drawing:
- Objects closer appear bigger and clearer.
- Objects farther appear smaller and lighter in detail.
- Overlapping shows which object is in front.
- Ellipses are used for the top of round objects like cups and flasks.
- Horizontal surfaces are shown with straight edges that reduce in size with distance.
Teaching Methods/Instructional Techniques
Discussion, Lecture, Demonstration, Question and Answer, Visual Aids
Instructional Procedures
Step 1: Introduction
Time: 5 minutes
Teaching Skill: Set Induction
Teacher’s Activity: The teacher shows a cup and flask and asks pupils to describe their shapes and where light and shadow appear, then introduces still life drawing as drawing arranged inanimate objects.
Pupils’ Activity: Pupils observe the objects and mention shapes, edges, and shadow areas seen on the table.
Learning Point: Still life drawing is done by observing arranged inanimate objects.
Step 2: Meaning of Still Life and Composition
Time: 7 minutes
Teaching Skill: Explanation
Teacher’s Activity: The teacher defines still life drawing and explains composition, then arranges the objects on a table and points out balance and overlapping.
Pupils’ Activity: Pupils copy notes and observe the arrangement, identifying the main object and overlaps.
Learning Point: Good arrangement of objects makes still life drawing clearer and balanced.
Step 3: Proportion, Shapes, and Forms
Time: 7 minutes
Teaching Skill: Demonstration
Teacher’s Activity: The teacher demonstrates measuring with a pencil, blocking in basic shapes, and building forms like cylinders for cups and flasks.
Pupils’ Activity: Pupils practise measuring and sketch basic shapes lightly before adding details.
Learning Point: Correct proportion and basic shapes help to draw objects accurately.
Step 4: Line Qualities, Directions, and Simple Perspective
Time: 6 minutes
Teaching Skill: Explanation
Teacher’s Activity: The teacher explains line qualities and directions and demonstrates drawing ellipses for cup openings and showing overlaps for depth.
Pupils’ Activity: Pupils draw cleaner outlines, practise ellipses, and show depth using overlap in their sketches.
Learning Point: Line control and simple perspective help objects look solid and correctly placed.
Step 5: Texture in Still Life Drawing
Time: 5 minutes
Teaching Skill: Demonstration
Teacher’s Activity: The teacher demonstrates how to show smooth and rough textures using shading, hatching, and careful highlights.
Pupils’ Activity: Pupils apply suitable texture methods to parts of their drawings where needed.
Learning Point: Texture is shown by the kind of lines and shading used on the surface.
Step 6: Shading Practical and Finishing
Time: 10 minutes
Teaching Skill: Guided Practice
Teacher’s Activity: The teacher guides pupils to shade based on the light direction, showing highlight, mid-tone, core shadow, and cast shadow, and supervises finishing and neatness.
Pupils’ Activity: Pupils shade their still life drawings, add cast shadows on the table, and improve neatness of outlines and tones.
Learning Point: Correct shading makes still life drawings look realistic and three-dimensional.
Step 7: Evaluation/Review
Time: 5 minutes
Teaching Skill: Questioning/Assessment
Teacher’s Activity: The teacher evaluates the learning by asking the following questions:
- Define still life drawing.
- State four guidelines for good still life composition.
- List three ways to achieve correct proportion in still life drawing.
- Mention four parts of shading used in still life drawing.
Pupils’ Activity: Pupils answer orally and in writing.
Learning Point: Pupils demonstrate understanding of the lesson.
Step 8: Conclusion
Time: 5 minutes
Teaching Skill: Summary
Teacher’s Activity: The teacher summarizes the key points, displays a few good works, corrects common mistakes, and gives an assignment to draw a still life arrangement of three objects at home showing proportion and shading.
Pupils’ Activity: Pupils submit classwork for checking and write the assignment in their notebooks.
Learning Point: Still life drawing depends on good composition, correct proportion, and proper shading.
Lesson Keywords
- Still Life – Drawing of arranged inanimate objects from observation.
- Composition – Arrangement of objects to make a drawing balanced and clear.
- Proportion – Correct size relationship between parts of objects in a drawing.
- Form – Three-dimensional appearance of an object shown through drawing and shading.
- Texture – Surface appearance of an object such as smooth or rough.
- Shading – Use of tones to show light, shadow, and depth.
- Perspective – Method of showing depth by making far objects appear smaller.
Differentiation
Pupils who learn faster will include three or more objects with clear shading and cast shadows, while pupils who need support will draw two objects with guided measurement and simple shading using light and dark tones.
Note for teachers using this lesson plan
Arrange objects where the light direction is clear and keep the setup stable throughout the lesson. Encourage pupils to draw lightly first, check proportions early, and build shading gradually from light to dark for neat results.
Community Join the conversation Open discussion +