

Note for teachers using this lesson plan
Before the lesson, prepare actual examples of clean water (e.g., in a clear bottle or bowl) and dirty water (e.g., water mixed with a little soil or sand in another bowl). Have pictures or charts ready to reinforce the visual differences. The central idea is for pupils to clearly distinguish between clean and dirty water and understand that only clean water is safe and usable. Observe pupils as they point to and describe the different types of water.
Class: Pre-School Level 2
Term: Second Term
Week: 8
Age: 3 years
Duration: 30 minutes
Subject: Pre-Science
Curriculum Theme: Not separately stated in the scheme.
Previous Lesson: Air Transportation and Smell in Air for Pre-School Level 2
Topic: WATER: DESCRIPTION, CLEAN WATER AND DIRTY WATER
Subject Matter: WATER. Description of Water. Clean and Dirty Water. Weekly focus: Water: Description, Clean Water and Dirty Water.
Specific Objectives
By the end of the lesson, pupils should be able to:
Cognitive Domain
- Describe water in simple terms.
- Identify clean water when shown.
- Identify dirty water when shown.
- State one use of clean water.
Affective Domain
- Show interest in observing different types of water.
- Appreciate the importance of clean water for health.
Psychomotor Domain
- Point to clean water and dirty water correctly.
- Participate in a simple water-related activity.
Social Domain
- Share their observations about water with peers and the teacher.
- Take turns in identifying water types.
Reference Materials
- NAPPS National Unified Teaching Scheme for Pre-School Level 2
- Early Childhood Care and Education resources
Instructional Materials
- A clear bowl of clean water
- A bottle of clean drinking water
- A bowl of dirty water (water mixed with a little soil/sand)
- Charts showing pictures of clean and dirty water
- Empty cups for demonstration
Rationale for the Lesson
This lesson introduces young children to the concept of water, its properties, and the crucial difference between clean and dirty water. Understanding this distinction at an early age helps pupils develop good hygiene habits and promotes awareness of health and safety, as consuming or using dirty water can lead to illness.
Prerequisite/Previous Knowledge
Pupils can observe and describe simple objects around them. They are familiar with water in their daily lives for drinking and washing.
Lesson Content/Board Summary
WATER: DESCRIPTION, CLEAN WATER AND DIRTY WATER
What is Water?
Water is a liquid that we need every day. Good water has:
- No colour (it is clear)
- No smell
- No taste
- It flows!
Clean Water
Clean water is clear and pure. It looks transparent, meaning you can see through it. We use clean water for:
- Drinking
- Washing our hands
- Bathing
- Washing fruits and vegetables
- Cooking
Dirty Water
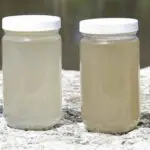
Dirty water is not clear. It can be cloudy, muddy, or have things floating in it. Dirty water is not good for us because:
- It can make us sick if we drink it.
- It has germs.
- It can have a bad smell.
Key Words
- Water – A clear liquid we drink and use.
- Clean – Not dirty, pure, safe to use.
- Dirty – Not clean, has dirt or germs, not safe to use.
Clean Water Song
Tune: “Twinkle, Twinkle Little Star”
Clean, clean water bright,
Helps us grow with all its might.
Drink it up, so fresh and clear,
Keeps us healthy, banishes fear.
Clean, clean water bright,
Makes us feel so good and right.
Actions:
- “Clean, clean water bright” – Point to clean water, make a sparkling motion.
- “Helps us grow with all its might” – Make a growing motion with hands.
- “Drink it up, so fresh and clear” – Pretend to drink from a cup.
- “Keeps us healthy, banishes fear” – Hug self, then push hands forward to show ‘banish’.
- Repeat actions.
Watch and Learn About Water
💡 Teacher Guide for Using This Board Summary
How to teach the content: Begin by showing the bowl of clean water and asking pupils to observe it. Guide them to describe its appearance, lack of smell, and how it flows. Then, introduce the bottled water as an example of drinking water. Next, present the dirty water, guiding pupils to describe its appearance and contrast it with the clean water. Emphasize why dirty water is harmful. Use simple, clear language and repeat key terms.
What to show or demonstrate: Show the clean water, bottled water, and dirty water. Pour a little clean water into an empty cup to show it flows and is clear. Point to pictures on charts showing clean water being used for drinking/washing and dirty water looking murky. You can also show how to make water dirty by adding a tiny bit of soil to clean water (teacher-led).
How to use the rhyme/song: Introduce the “Clean Water Song” after discussing clean water. Sing it together with the actions, repeating it several times to help pupils remember the importance of clean water. Encourage pupils to do the actions.
How to use the video: Introduce the video as a fun way to learn more about clean and dirty water. Play the video, asking pupils to pay attention to what clean water looks like and what dirty water looks like. After watching, discuss what they saw and reinforce the key differences and uses.
What to watch for: Observe if pupils can correctly identify clean and dirty water. Watch for pupils who might try to touch the dirty water and gently remind them why it’s not safe. Ensure all pupils participate in the observations and discussions.
Teaching Methods/Instructional Techniques
- Play-based Learning
- Demonstration
- Guided Practice
- Observation
- Question and Answer
- Songs and Rhymes
- Picture Talk
Instructional Procedures
Step 1: Introduction
Time: 3 minutes
Teaching Skill: Engaging/Greeting
Teacher’s Activity: The teacher greets the pupils warmly and starts by asking them what they drank in the morning or what they use to wash their hands. The teacher then introduces the topic: “Today, we are going to learn all about water!”
Pupils’ Activity: Pupils respond to the teacher’s questions and listen attentively.
Learning Point: Pupils are introduced to the topic of water and its relevance.
Step 2: Describing Water
Time: 5 minutes
Teaching Skill: Observation/Description
Teacher’s Activity: The teacher brings out a clear bowl of clean water. “Look, children! What is this? What colour is it? Can you smell anything? Does it have a taste?” The teacher guides pupils to notice that water is clear, has no smell, and flows.
Pupils’ Activity: Pupils observe the water, respond to questions, and try to describe it.
Learning Point: Pupils understand basic properties of water (clear, no smell, flows).
Step 3: Introducing Clean Water
Time: 4 minutes
Teaching Skill: Identification/Explanation
Teacher’s Activity: The teacher shows a bottle of clean drinking water. “This is clean water. It is good for us! What do we use clean water for?” The teacher discusses uses like drinking, washing hands, and bathing, using simple examples and pictures.
Pupils’ Activity: Pupils identify the clean water and mention uses they know.
Learning Point: Pupils recognise clean water and its importance for daily activities.
Step 4: Introducing Dirty Water
Time: 4 minutes
Teaching Skill: Comparison/Warning
Teacher’s Activity: The teacher brings out a bowl of dirty water. “Now look at this water. Is it clear like the other one? What colour is it? Can we drink this water?” The teacher explains that dirty water has germs and can make us sick.
Pupils’ Activity: Pupils observe the dirty water, compare it to clean water, and understand it is not safe.
Learning Point: Pupils recognise dirty water and understand why it is harmful.
Step 5: Comparing Clean and Dirty Water with Rhyme
Time: 5 minutes
Teaching Skill: Reinforcement/Singing
Teacher’s Activity: The teacher places the clean and dirty water side-by-side, using charts to show clear differences. “See, clean water is good, dirty water is bad!” The teacher then leads pupils in singing the “Clean Water Song” with actions to reinforce the lesson.
Pupils’ Activity: Pupils point to clean and dirty water, sing the song, and perform the actions.
Learning Point: Pupils reinforce their understanding of the differences between clean and dirty water through song and visual comparison.
Step 6: Practical Identification and Video
Time: 4 minutes
Teaching Skill: Application/Visual Learning
Teacher’s Activity: The teacher asks pupils to point to the clean water and the dirty water. “Which water is safe to drink?” The teacher then plays the short video on clean and dirty water, encouraging pupils to watch and identify what they see.
Pupils’ Activity: Pupils point to the correct water types and watch the video, identifying examples.
Learning Point: Pupils apply their knowledge to identify water types and learn from a visual aid.
Step 7: Evaluation/Review
Time: 4–5 minutes
Teaching Skill: Questioning/Assessment
Teacher’s Activity: The teacher checks pupils’ understanding through short questions and practical tasks.
- “What does clean water look like?” (e.g., clear, no colour)
- “Show me the clean water.” (Teacher points to both bowls)
- “What do we use clean water for?” (e.g., drinking, washing)
- “Which water can make us sick?” (e.g., dirty water)
Pupils’ Activity: Pupils respond orally and demonstrate the required skill where appropriate.
Learning Point: Pupils demonstrate understanding of the lesson.
Step 8: Conclusion
Time: 1 minute
Teaching Skill: Summarising
Teacher’s Activity: The teacher praises the pupils for their participation and reminds them to always drink clean water and tell an adult if they see dirty water. “Always remember, clean water keeps us healthy and strong!”
Pupils’ Activity: Pupils listen and repeat the importance of clean water.
Learning Point: Pupils understand the final message about clean water and health.
Lesson Keywords
- Water – A clear liquid that we drink and use for many things.
- Clean – Not dirty; pure and safe to use.
- Dirty – Not clean; has dirt or germs and is not safe.
Differentiation
- Support: For pupils who struggle, provide closer one-on-one observation of the water, use larger and more distinct pictures, and repeat the key differences between clean and dirty water multiple times. Guide their hands to point to the correct water types.
- Extension: For pupils who grasp the concept quickly, ask them to identify other places where they see clean water (e.g., rain, tap) or dirty water (e.g., muddy puddles). Encourage them to name more uses for clean water.
Community Join the conversation Open discussion +