

Note for teachers using this lesson plan
Before this lesson, ensure you have three distinct samples of soil: sandy soil, clay soil, and loamy soil. Display them clearly in separate bowls or trays. The central idea for pupils is to understand that soil is important and comes in different types, which they can identify by sight and touch. Observe pupils as they touch and describe the soil samples, and check if they can correctly name each type.
Class: Pre-School Level 2
Term: Third Term
Week: 6
Age: 3 years
Duration: 30 minutes
Subject: Pre-Science
Curriculum Theme: Pre-Science
Previous Lesson: Things found in our environment
Topic: SOIL: MEANING AND TYPES OF SOIL
Subject Matter: Meaning of Soil, its types (Clay, Loam, Sandy Soil), and simple uses.
Specific Objectives
By the end of the lesson, pupils should be able to:
Cognitive Domain
- State the simple meaning of soil.
- Identify samples of sandy soil, clay soil, and loamy soil.
- Mention the names of different types of soil.
Affective Domain
- Show interest in exploring different soil samples.
- Appreciate the importance of soil for plants and building.
Psychomotor Domain
- Touch and feel different soil samples.
- Point to specific soil types when named.
Social Domain
- Participate in group activities related to soil observation.
- Take turns sharing observations about soil.
Reference Materials
- NAPPS National Unified Teaching Scheme for Pre-School Level 2
- Early Childhood Care and Education resources
Instructional Materials
- Samples of sandy soil (e.g., from a playground or river bank)
- Samples of clay soil (e.g., from a construction site or pottery area)
- Samples of loamy soil (e.g., from a garden)
- Three separate bowls or trays for displaying soil samples
- Small watering can or bottle of water
- Charts or posters showing pictures of different soil types and their uses
Rationale for the Lesson
This lesson helps 3-year-old pupils understand a fundamental part of their natural environment – soil. By exploring soil through touch and sight, they develop early scientific observation skills and begin to appreciate how soil supports life, such as growing plants, which connects directly to their daily experiences with food and nature.Prerequisite/Previous Knowledge
Pupils can identify and name some common objects and natural elements found in their immediate environment.Lesson Content/Board Summary
SOIL: MEANING AND TYPES OF SOIL
What is Soil?
Soil is the brown or black dirt we see on the ground. It is where plants grow, and it is home to many small creatures. We can touch it and play with it.
Types of Soil
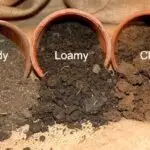
- Sandy Soil: This soil feels rough and grainy, like tiny stones or sand. Water passes through it very quickly.
- Clay Soil: This soil feels smooth and sticky when wet. It can be moulded into shapes. Water does not pass through it easily.
- Loamy Soil: This soil feels soft and a bit crumbly. It is a mix of sand and clay, and it is very good for growing plants.
Uses of Soil
- Soil helps plants and trees grow, giving us food.
- We can use soil (especially clay) to make mud houses or bricks.
- Animals like earthworms and ants live in the soil.
Key Words
- Soil – the brown or black dirt on the ground.
- Sandy – soil that feels rough and grainy.
- Clay – soil that feels smooth and sticky when wet.
- Loamy – soil that feels soft and crumbly, good for plants.
Our Soil Song
Tune: “Twinkle, Twinkle Little Star”
Soil, soil, brown and deep,
Where the little seeds all sleep.
Sandy, clay, and loamy too,
Different soils for me and you.
Soil, soil, helps us grow,
All the food we love to know!
Actions:
- “Soil, soil, brown and deep”: Point to the ground, then make a digging motion.
- “Where the little seeds all sleep”: Cup hands together as if holding a seed.
- “Sandy, clay, and loamy too”: Wiggle fingers for sandy, clap hands together for clay, then spread hands out for loamy.
- “Different soils for me and you”: Point to self and then to friends.
- “Soil, soil, helps us grow”: Point to the ground, then make a growing motion with hands.
- “All the food we love to know!”: Rub tummy.
Watch and Learn About Soil
💡 Teacher Guide for Using This Board Summary
How to teach the content: Begin by showing the pupils a small amount of soil and asking “What is this?” and “Where do we find it?”. Explain the simple meaning of soil using child-friendly language. Then, introduce each soil type one by one, allowing pupils to touch and feel each sample in their bowls. Use descriptive words like “rough,” “sticky,” “soft.” Emphasize the differences in texture and appearance.
What to show or demonstrate: Display the three soil samples clearly labelled (or verbally named) in separate bowls. Allow pupils to gently touch each sample. You can also demonstrate how sandy soil lets water pass quickly by pouring a little water on it, and how clay soil can be moulded by wetting a small piece and shaping it.
How to use the rhyme/song: Sing the “Our Soil Song” together, performing the actions. Repeat it a few times to help pupils remember the names and characteristics of the soil types. Encourage them to sing along and do the actions.
How to use the video: Introduce the video by saying, “Let’s watch a short video to learn more about our friend, the soil!” Play the video, ensuring pupils can see and hear it clearly. After watching, ask simple questions like “What did you see in the video?” or “What grows in the soil?”. Help them connect the video content to the soil samples they touched.
What to watch for: Observe if pupils can differentiate between the textures of the soil types. Watch for their engagement and willingness to touch and explore. Correct any misconceptions gently and reinforce the names of the soil types through repetition.
Teaching Methods/Instructional Techniques
- Play-based Learning
- Demonstration
- Guided Practice
- Songs and Rhymes
- Picture Talk
- Question and Answer
- Manipulation of Objects
- Repetition
Instructional Procedures
Step 1: Introduction
Time: 3 minutes
Teaching Skill: Engagement/Recall
Teacher’s Activity: The teacher greets the pupils and starts by singing a simple welcome song. The teacher then shows a small amount of soil in a container and asks, “What is this?” and “Where do we find it?”.
Pupils’ Activity: Pupils respond to greetings, sing along, and try to answer the teacher’s questions, pointing to the soil.
Learning Point: Pupils are engaged and introduced to the topic of soil.
Step 2: Meaning of Soil
Time: 4 minutes
Teaching Skill: Explanation/Observation
Teacher’s Activity: The teacher explains the meaning of soil in simple terms, using the Board Summary content. “Soil is the brown dirt on the ground where plants grow.” The teacher shows a general sample of soil.
Pupils’ Activity: Pupils listen attentively and observe the soil sample. They repeat “Soil is dirt” after the teacher.
Learning Point: Pupils understand the basic meaning of soil.
Step 3: Introducing Sandy Soil
Time: 5 minutes
Teaching Skill: Demonstration/Sensory Exploration
Teacher’s Activity: The teacher brings out the sandy soil sample. “Look at this soil! This is sandy soil.” The teacher describes its texture (rough, grainy) and allows pupils to gently touch it. “How does it feel?”
Pupils’ Activity: Pupils observe the sandy soil, gently touch it, and describe how it feels (e.g., “rough,” “like sand”). They repeat “sandy soil.”
Learning Point: Pupils identify and feel sandy soil.
Step 4: Introducing Clay Soil
Time: 5 minutes
Teaching Skill: Demonstration/Sensory Exploration
Teacher’s Activity: The teacher brings out the clay soil sample. “Now look at this one! This is clay soil.” The teacher describes its texture (smooth, sticky when wet) and allows pupils to touch it. The teacher may wet a small piece to show it can be moulded.
Pupils’ Activity: Pupils observe the clay soil, gently touch it, and describe how it feels (e.g., “smooth,” “sticky”). They repeat “clay soil.”
Learning Point: Pupils identify and feel clay soil.
Step 5: Introducing Loamy Soil
Time: 4 minutes
Teaching Skill: Demonstration/Sensory Exploration
Teacher’s Activity: The teacher brings out the loamy soil sample. “And this is loamy soil!” The teacher describes its texture (soft, crumbly, good for plants) and allows pupils to touch it. “This soil is very good for growing plants.”
Pupils’ Activity: Pupils observe the loamy soil, gently touch it, and describe how it feels (e.g., “soft,” “crumbly”). They repeat “loamy soil.”
Learning Point: Pupils identify and feel loamy soil.
Step 6: Reinforcement Activity and Song
Time: 5 minutes
Teaching Skill: Reinforcement/Application
Teacher’s Activity: The teacher leads pupils in singing “Our Soil Song” with actions, pointing to each soil sample as its type is mentioned. The teacher then plays the short video about soil and asks pupils to watch carefully.
Pupils’ Activity: Pupils sing the soil song with actions, pointing to the correct soil samples. They watch the video and listen.
Learning Point: Pupils reinforce their understanding of soil and its types through song and visual learning.
Step 7: Evaluation/Review
Time: 4–5 minutes
Teaching Skill: Questioning/Assessment
Teacher’s Activity: The teacher checks pupils’ understanding through short questions and practical tasks.
- “What is this brown dirt called?” (Pointing to any soil sample)
- “Point to the sandy soil.”
- “Which soil feels sticky when wet?”
- “Which soil is good for growing plants?”
Pupils’ Activity: Pupils respond orally and demonstrate the required skill where appropriate by pointing to the correct soil sample.
Learning Point: Pupils demonstrate understanding of the lesson by identifying and naming soil types.
Step 8: Conclusion
Time: 1 minute
Teaching Skill: Summary/Closure
Teacher’s Activity: The teacher briefly summarizes the lesson, reminding pupils that soil is important and comes in different types. The teacher leads a farewell song.
Pupils’ Activity: Pupils listen to the summary and sing the farewell song.
Learning Point: Pupils consolidate their learning and prepare for dismissal.
Lesson Keywords
- Soil – The loose, top layer of the Earth’s surface where plants grow.
- Sandy Soil – Soil that feels rough and gritty, like beach sand.
- Clay Soil – Soil that feels smooth and sticky when wet, good for moulding.
- Loamy Soil – Soil that feels soft and crumbly, a good mix for growing plants.
Differentiation
- Support: For pupils who are struggling, provide more one-on-one guidance. Allow them to touch the soil samples multiple times while repeating the names. Use hand-over-hand guidance to help them feel the textures. Focus on identifying just two types of soil first (e.g., sandy and clay) before introducing the third.
- Extension: For pupils who grasp the concept quickly, ask them to identify where they might find each type of soil (e.g., “Where do you think we find sandy soil?”). Encourage them to describe the texture of each soil type using more words (e.g., “very rough,” “a little sticky”).

Community Join the conversation Open discussion +