

Class: Senior Secondary School 1 (SS1, SS 1, SSS1, SSS 1)
Term: 2nd Term
Week: 10
Age: 15 years
Duration: 45 minutes
Subject: Basic Electricity
Curriculum Theme: Basic Electricity
Previous Lesson: Magnets: Origin, Properties and Flux Lines.
Topic: MAGNETS
Subject Matter: characteristics of magnets, applications of magnets, generation of EMF using magnets, simple measurement of distance between magnet poles
Specific Objectives
By the end of the lesson, pupils should be able to:
Cognitive Domain:
- Define a magnet and state its characteristics.
- List at least three applications of magnets in daily life.
- Explain how electromotive force (EMF) can be generated using magnets.
Affective Domain:
- Appreciate the importance of magnets in various technological applications.
- Show interest in performing experiments involving magnets and electricity.
Psychomotor Domain:
- Demonstrate the generation of EMF using a magnet, coil, and galvanometer.
- Carry out simple measurements of the distance between magnet poles.
Social Domain:
- Collaborate effectively with peers during practical activities.
Reference Materials
The following resources were used in planning this lesson:
- 9 Years Basic Education Curriculum for Basic Science and Technology.
- State Unified Scheme of Work for Senior Secondary School Physics.
- Anyakoha, M.W. (2015). *New School Physics for Senior Secondary Schools*. Africana First Publishers Plc.
Instructional Materials
The teacher will teach this lesson with the aid of:
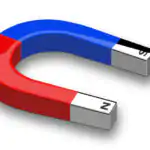
- Bar magnets and horseshoe magnets.
- Coil wire.
- Galvanometer.
- Ruler or measuring tape.
- Charts showing various applications of magnets.
Rationale for the Lesson
This lesson helps pupils understand the fundamental properties and uses of magnets, which are common in many devices around them. It also introduces them to the basic concept of electricity generation, linking magnetism to practical applications in technology and daily life.
Prerequisite/Previous Knowledge
Pupils should have a basic understanding of forces, materials, and simple electrical circuits from their previous science lessons.
Lesson Content/Board Summary
MAGNETS
Definition of a Magnet
A magnet is an object that produces a magnetic field and attracts ferromagnetic materials like iron, nickel, and cobalt.
Characteristics of Magnets
The following are characteristics of magnets:
- A magnet has two poles: a North pole and a South pole.
- Like poles repel each other, while unlike poles attract each other.
- A freely suspended magnet always rests in the North-South direction.
- Magnets attract magnetic materials.
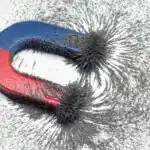
- The magnetic effect is strongest at the poles.
- Magnets can be demagnetized by heating, hammering, or by placing them in an alternating magnetic field.
Applications of Magnets
Magnets are used in various applications, including:
- Electric motors and generators.
- Loudspeakers and microphones.
- Magnetic compasses for navigation.
- Data storage devices like hard drives and credit cards.
- Magnetic resonance imaging (MRI) in medicine.
- Maglev trains (magnetic levitation trains).
- Separation of magnetic materials from non-magnetic ones (e.g., in recycling).
Generation of Electromotive Force (EMF) using Magnets
Electromotive force (EMF) is generated when there is a relative motion between a conductor (like a coil wire) and a magnetic field. This principle is known as electromagnetic induction.
Ways to generate EMF using magnets:
- Moving a magnet near a stationary coil of wire.
- Moving a coil of wire within a stationary magnetic field.
- Changing the magnetic field strength passing through a coil.
The induced EMF causes a current to flow in the conductor, which can be detected by a galvanometer.
Simple Measurement of Distance Between Magnet Poles
The distance between magnet poles refers to the physical separation between the North and South poles of a magnet, especially in bar or horseshoe magnets. This can be measured using a ruler.
Steps to measure distance between magnet poles:
- Place the magnet on a flat surface.
- Use a ruler to measure the length from the center of one pole to the center of the other pole.
- Record the measurement in appropriate units (e.g., centimeters).
Teaching Methods/Instructional Techniques
Discussion, Lecture, Demonstration, Question and Answer, Visual Aids
Instructional Procedures
Step 1: Introduction
Time: 5 minutes
Teaching Skill: Set Induction
Teacher’s Activity: The teacher greets the pupils and asks them if they have ever played with magnets or seen them in use (e.g., on a refrigerator door, in toys). The teacher then introduces the topic “Magnets”.
Pupils’ Activity: Pupils respond to the teacher’s questions and share their experiences with magnets.
Learning Point: Pupils are engaged and link the topic to their prior experiences.
Step 2: Characteristics of Magnets
Time: 10 minutes
Teaching Skill: Explanation/Demonstration
Teacher’s Activity: The teacher explains what a magnet is and demonstrates various characteristics of magnets using bar magnets (attraction/repulsion, poles, attraction of magnetic materials, direction of a suspended magnet). The teacher writes key points on the board.
Pupils’ Activity: Pupils observe the demonstrations, ask questions, and take notes.
Learning Point: Pupils understand the fundamental properties of magnets.
Step 3: Applications of Magnets
Time: 5 minutes
Teaching Skill: Discussion/Visual Aids
Teacher’s Activity: The teacher displays charts showing different applications of magnets and discusses their uses in everyday life and technology. The teacher encourages pupils to mention other applications they know.
Pupils’ Activity: Pupils observe the charts, listen to the explanations, and contribute examples of magnet applications.
Learning Point: Pupils identify and appreciate the practical uses of magnets.
Step 4: Generation of Electromotive Force (EMF) using Magnets
Time: 10 minutes
Teaching Skill: Demonstration/Explanation
Teacher’s Activity: The teacher sets up an experiment with a coil wire, a galvanometer, and a magnet. The teacher demonstrates how moving the magnet in and out of the coil generates an electric current (indicated by the galvanometer). The teacher explains the principle of electromagnetic induction.
Pupils’ Activity: Pupils observe the demonstration carefully, ask questions for clarification, and understand the link between magnetism and electricity.
Learning Point: Pupils understand the concept of EMF generation through electromagnetic induction.
Step 5: Simple Measurement of Distance Between Magnet Poles
Time: 5 minutes
Teaching Skill: Practical/Guidance
Teacher’s Activity: The teacher provides each group of pupils with different types of magnets (bar, horseshoe) and a ruler. The teacher guides them on how to measure the distance between the poles of the magnets.
Pupils’ Activity: Pupils, in groups, practice measuring the distances between the poles of the given magnets and record their measurements.
Learning Point: Pupils develop practical skills in simple measurement related to magnets.
Step 6: Class Activity/Discussion
Time: 3 minutes
Teaching Skill: Collaborative Learning
Teacher’s Activity: The teacher asks pupils to discuss in pairs what they have learned so far and identify one new thing they found interesting about magnets.
Pupils’ Activity: Pupils discuss with their partners and share their insights with the class.
Learning Point: Pupils reinforce their understanding through peer discussion.
Step 7: Evaluation/Review
Time: 5 minutes
Teaching Skill: Questioning/Assessment
Teacher’s Activity: The teacher evaluates the learning by asking the following questions:
- Define a magnet.
- State three characteristics of a magnet.
- List two applications of magnets.
- Explain briefly how EMF can be generated using a magnet and a coil.
Pupils’ Activity: Pupils answer orally and in writing.
Learning Point: Pupils demonstrate understanding of the lesson.
Step 8: Conclusion
Time: 2 minutes
Teaching Skill: Summarization
Teacher’s Activity: The teacher summarizes the key points of the lesson, emphasizing the importance of magnets and their link to electricity generation. The teacher assigns homework: “Draw and label a bar magnet, showing its poles and magnetic field lines.”
Pupils’ Activity: Pupils listen to the summary and copy the homework.
Learning Point: Pupils consolidate their learning and receive follow-up tasks.
Lesson Keywords
- Magnet – An object that produces a magnetic field and attracts ferromagnetic materials.
- Poles – The regions of a magnet where the magnetic effect is strongest (North and South).
- Repulsion – The force that pushes like poles of magnets apart.
- Attraction – The force that pulls unlike poles of magnets together.
- Electromagnetic Induction – The process of generating an electromotive force (EMF) in a conductor by changing the magnetic field around it.
- EMF (Electromotive Force) – The voltage produced by a source, such as a battery or generator, that drives current in an electrical circuit.
- Galvanometer – An instrument used for detecting and measuring small electric currents.
Differentiation
For pupils who grasp concepts quickly, the teacher can challenge them to research more complex applications of magnets or delve deeper into the theory of electromagnetic induction. For pupils needing extra support, the teacher can provide more hands-on practice with the magnets, simplified explanations, and visual aids, ensuring they understand the basic properties and uses before moving to EMF generation.
Note for teachers using this lesson plan
Ensure all demonstration materials are readily available and in good working condition before the lesson. Encourage pupil participation and hands-on activities, especially for the EMF generation and measurement steps. Safety precautions should be observed during practical sessions, particularly when handling electrical components. Emphasize real-world examples to make the lesson relatable and engaging for the pupils.

Community Join the conversation Open discussion +