

Class: Junior Secondary School 3 (JSS 3)
Term: 2nd Term
Week: 5
Age: 14 years
Duration: 45 minutes
Subject: Cultural And Creative Arts
Curriculum Theme: Cultural And Creative Arts
Previous Lesson: Funding for Art Business
Topic: Introduction To Embroidery
Subject Matter: Meaning and definition of embroidery, Embroidery materials and tools, Sources of embroidery: nature, environment, flowers, magazines, gift wrappers, etc.
SPECIFIC OBJECTIVES
By the end of the lesson, pupils should be able to:
Cognitive Domain:
(a) Explain the meaning of embroidery.
(b) Identify common materials and tools used for embroidery.
(c) State various sources of embroidery designs.
Affective Domain:
(a) Show appreciation for embroidery as a cultural and creative art.
(b) Develop interest in decorative needlework.
Psychomotor Domain:
(a) Identify and handle basic embroidery tools correctly.
(b) Sketch simple embroidery design ideas from common sources.
Social Domain:
(a) Work cooperatively in groups to discuss embroidery designs.
(b) Respect others’ creative ideas and cultural expressions.
REFERENCE MATERIALS
The following resources was used in planning this lesson:
- 9 Years Basic Education Curriculum
- Lagos State Unified Scheme of Work for Junior Secondary Schools
- Britannica – Embroidery: Textile Art (https://www.britannica.com/art/embroidery)
- Relevant Textbooks
INSTRUCTIONAL MATERIALS
The teacher will teach this lesson with the aid of:
- Samples of embroidered fabrics
- Embroidery needles and threads
- Hoops, scissors, and fabric pieces
- Pictures from magazines and gift wrappers
- Charts showing embroidery tools and materials
RATIONALE FOR THE LESSON
This lesson introduces pupils to embroidery, helping them develop creativity, cultural appreciation, and basic skills in decorative textile art.
PREREQUISITE/PREVIOUS KNOWLEDGE
Pupils have basic knowledge of simple art and craft activities and have seen decorated fabrics or clothing in their environment.
LESSON CONTENT/BOARD SUMMARY
INTRODUCTION TO EMBROIDERY
Meaning and Definition of Embroidery
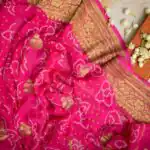
Embroidery is a decorative art that involves using needle and thread to create patterns or designs on fabric. It is used to beautify clothes, household items, and artworks.
The following are key points about embroidery:
- It is a form of decorative needlework.
- It uses thread stitched on fabric.
- It enhances the beauty of materials.
Embroidery Materials and Tools
Embroidery materials and tools are items required to create embroidered designs. Proper tools make embroidery easier and neater.
These include:
- Needle – used for stitching designs.
- Thread – used to form patterns on fabric.
- Fabric – base material for embroidery.
- Hoop – holds fabric firmly while stitching.
- Scissors – used for cutting thread and fabric.
Sources of Embroidery Designs
Embroidery designs are inspired by objects and images around us. These sources help artists create attractive patterns.
Examples are:
- Nature – trees, animals, and landscapes.
- Environment – houses, tools, and daily objects.
- Flowers – roses, leaves, and petals.
- Magazines – pictures and printed designs.
- Gift wrappers – decorative patterns and shapes.
TEACHING METHODS/INSTRUCTIONAL TECHNIQUES
Discussion, Explanation, Demonstration, Visual Aids, Group Work
INSTRUCTIONAL PROCEDURES
To deliver this lesson, the teacher will adopt the following steps:
Step 1: Introduction
Time: 5 minutes
Teaching Skill: Set Induction
Teacher’s Activity: The teacher asks pupils about decorated clothes and fabrics they have seen and links responses to embroidery.
Pupils’ Activity: Pupils respond and share observations.
Learning Point: Embroidery is a decorative art seen in everyday life.
Step 2: Meaning of Embroidery
Time: 8 minutes
Teaching Skill: Explanation
Teacher’s Activity: The teacher defines embroidery and explains its purpose.
Pupils’ Activity: Pupils listen and take note of key ideas.
Learning Point: Embroidery is decorative needlework on fabric.
Step 3: Embroidery Materials and Tools
Time: 10 minutes
Teaching Skill: Demonstration
Teacher’s Activity: The teacher displays embroidery tools and explains their uses.
Pupils’ Activity: Pupils observe and identify the tools.
Learning Point: Different tools are needed for embroidery work.
Step 4: Sources of Embroidery Designs
Time: 7 minutes
Teaching Skill: Discussion
Teacher’s Activity: The teacher discusses various design sources using pictures and examples.
Pupils’ Activity: Pupils mention design sources they know.
Learning Point: Embroidery designs come from nature and everyday objects.
Step 5: Note-Taking
Time: 5 minutes
Teaching Skill: Guided Writing
Teacher’s Activity: The teacher guides pupils to copy the board summary.
Pupils’ Activity: Pupils copy notes neatly.
Learning Point: Important points are recorded for revision.
Step 6: Evaluation/Review
Time: 5 minutes
Teaching Skill: Questioning
Teacher’s Activity: The teacher evaluates the learning by asking the following questions:
- What is embroidery?
- List three embroidery tools.
- Mention two sources of embroidery designs.
Pupils’ Activity: Pupils answer questions orally.
Learning Point: Understanding of the lesson is assessed.
Step 7: Conclusion
Time: 5 minutes
Teaching Skill: Summarization
Teacher’s Activity: The teacher summarizes the lesson and encourages creativity.
Pupils’ Activity: Pupils listen attentively.
Learning Point: Embroidery is a useful and creative art skill.
LESSON KEYWORDS
- Embroidery – decorative stitching on fabric
- Needle – tool used for stitching
- Thread – material used for making designs
- Hoop – frame that holds fabric tight
- Design – pattern used for decoration
DIFFERENTIATION
Use real objects and pictures for visual learners, demonstrations for practical learners, and group discussions for social learners.
NOTE FOR TEACHERS USING THIS LESSON PLAN
Encourage pupils to observe embroidered items at home and bring ideas for future practical lessons. Emphasize safety when handling needles and scissors.

Community Join the conversation Open discussion +