

Note for teachers using this lesson plan
This lesson introduces students to the concept of soil texture and its types. Ensure you have various soil samples (sandy, silty, clayey if possible) ready for practical demonstration and group activities. Emphasise safety during soil collection and guide students in observing and labelling the samples accurately. By the end of the lesson, students should be able to define soil texture, identify sand, and participate in collecting and labelling soil samples.
Class: JSS 1
Term: First Term
Week: 3
Age: 12 years
Duration: 45 minutes
Subject: Horticulture and Crop Production
Curriculum Theme: Crop Production
Focal competence: identify different soil texture
Key competencies/values: Collaboration; Critical Thinking; Respect
Skills:
- Identifying soil texture
Previous Lesson: Planting, Transplanting, Weeding and Harvesting Tools with Safety Measures
Topic: Soil Texture
Subject Matter: meaning of soil texture, sand, silt, clay, effects of soil texture
Specific Objectives
By the end of the lesson, pupils/students should be able to:
Cognitive Domain
- define soil texture;
- identify the types of soil texture: sand.
Affective Domain
- appreciate the importance of collaboration in group activities;
- show respect for different opinions during discussions.
Psychomotor Domain
- label soil texture;
- take different soil samples.
Reference Materials
The following resources were used in planning this lesson:
- 2025 Revised 9 Years Basic Education Curriculum
- Relevant State Unified Scheme of Work
- Pre-Vocational Studies for Junior Secondary Schools 1
- The HeadTeacher Scheme of work
Instructional Materials
The teacher will teach this lesson with the aid of:
- Soil samples (sand, silt, clay if available)
- Soil triangle (chart)
- Hydrometer (for demonstration, if available)
- Water
- Labels
- Chart showing soil components
- Video clips on soil texture
- Whiteboard
- Marker
Rationale for the Lesson
Understanding soil texture is fundamental in horticulture and crop production as it influences water retention, nutrient availability, and root penetration. This lesson provides students with practical skills to identify different soil types, which is essential for making informed decisions about crop selection and soil management for optimal plant growth.
Prerequisite/Previous Knowledge
Students should have a basic understanding of what soil is and its general importance for plants.
Lesson Content/Board Summary
Soil Texture
Meaning of Soil Texture
Soil texture refers to the relative proportion of different-sized mineral particles in the soil. These particles are classified into three main types based on their size: sand, silt, and clay.
Types of Soil Texture
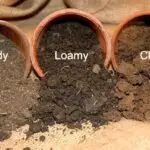
There are three primary types of soil particles that determine soil texture:
- Sand: These are the largest soil particles. Sand feels gritty when rubbed between the fingers. Sandy soils are well-aerated but drain water quickly and have low nutrient retention.
- Silt: Silt particles are medium-sized, smaller than sand but larger than clay. Silt feels smooth and floury when wet. Silty soils have moderate water retention and aeration.
- Clay: Clay particles are the smallest soil particles. Clay feels sticky and plastic when wet. Clayey soils have high water retention, but poor aeration and can become compacted easily.
Effects of Soil Texture
Soil texture significantly affects various properties of the soil, which in turn impact plant growth:
- Water Retention: Clay soils hold more water due to their small particle size and large surface area, while sandy soils drain water quickly.
- Aeration: Sandy soils have larger pore spaces, allowing for good air circulation (aeration), which is important for root respiration. Clay soils have poor aeration.
- Nutrient Retention: Clay particles can hold more nutrients due to their chemical properties, while sandy soils tend to lose nutrients easily through leaching.
- Workability: Sandy soils are easy to cultivate (workable). Clay soils can be very hard when dry and sticky when wet, making them difficult to work with.
- Root Penetration: Roots can penetrate sandy and silty soils more easily than compacted clay soils.
Identification of Soil Texture (Sand)
Sand can be identified through simple observation and feel:
- By Sight: Sand particles are visible to the naked eye and appear coarse.
- By Feel: When a small amount of moist sandy soil is rubbed between the fingers, it feels distinctly gritty.
Teaching Methods/Instructional Techniques
Discussion, Demonstration, Guided Practice, Question and Answer, Explanation, Observation, Group Work, Practical Activity
Instructional Procedures
Step 1: Introduction
Time: 5 minutes
Teaching Skill: Recalling/Engaging
Teacher’s Activity: The teacher greets the students and asks questions about the previous lesson on types of soil. The teacher then introduces the new topic, “Soil Texture,” by asking students what they think makes soils different from each other.
Pupils’ Activity: Students respond to questions about the previous lesson and share their ideas about soil differences.
Learning Point: Soil texture introduction
Step 2: Meaning of Soil Texture
Time: 7 minutes
Teaching Skill: Explanation/Definition
Teacher’s Activity: The teacher explains the meaning of soil texture as the proportion of sand, silt, and clay particles. The teacher uses a chart showing soil components to illustrate the different particle sizes.
Pupils’ Activity: Students listen attentively, observe the chart, and ask questions for clarification.
Learning Point: Meaning of soil texture
Step 3: Types of Soil Texture
Time: 8 minutes
Teaching Skill: Description/Demonstration
Teacher’s Activity: The teacher describes the three main types of soil particles (sand, silt, clay) and their characteristics, using prepared soil samples for demonstration. Students are encouraged to feel each sample.
Pupils’ Activity: Students observe and feel the different soil samples, noting their characteristics.
Learning Point: Types of soil texture
Step 4: Identifying Sand Texture
Time: 7 minutes
Teaching Skill: Practical Demonstration/Guidance
Teacher’s Activity: The teacher specifically demonstrates how to identify sandy soil by its gritty feel and visible particles. The teacher guides individual students to practice this identification with a sandy soil sample.
Pupils’ Activity: Students practice identifying sandy soil by touch and sight under the teacher’s guidance.
Learning Point: Identifying sand texture
Step 5: Taking and Labelling Soil Samples
Time: 8 minutes
Teaching Skill: Group Work/Practical Activity
Teacher’s Activity: The teacher divides students into groups and instructs them to take different soil samples from designated areas (e.g., school garden, playground) and label them based on their initial observations (e.g., “gritty soil,” “smooth soil”).
Pupils’ Activity: In groups, students collect different soil samples and label them according to their observed texture.
Learning Point: Soil sample collection
Step 6: Effects of Soil Texture
Time: 5 minutes
Teaching Skill: Explanation/Discussion
Teacher’s Activity: The teacher leads a discussion on the effects of different soil textures on water retention, aeration, nutrient retention, and workability, relating it to crop production.
Pupils’ Activity: Students participate in the discussion, sharing their thoughts on how different soil textures might affect plant growth.
Learning Point: Effects of soil texture
Step 7: Evaluation/Review
Time: 5 minutes
Teaching Skill: Questioning/Assessment
Teacher’s Activity: The teacher evaluates the learning by asking the following questions:
- What is soil texture?
- Mention two types of soil particles.
- How does sand feel when rubbed between your fingers?
- State one effect of soil texture on crop production.
Pupils’ Activity: Pupils answer orally and in writing.
Learning Point: Soil texture knowledge
Step 8: Note-Taking
Time: 4 minutes
Teaching Skill: Guided Writing
Teacher’s Activity: The teacher guides pupils/students to copy the essential Board Summary notes on the meaning, types, and effects of soil texture into their notebooks.
Pupils’ Activity: Pupils/students copy the notes carefully into their notebooks.
Learning Point: Board notes copying
Step 9: Conclusion
Time: 1 minute
Teaching Skill: Summarising
Teacher’s Activity: The teacher briefly summarises the key points of the lesson, reinforcing the importance of understanding soil texture for successful farming.
Pupils’ Activity: Students listen and reflect on the lesson.
Learning Point: Lesson consolidation
Continuous Assessment/Further Study
Type: Homework/Practical Exercise
Instruction: Observe the soil in your compound or a nearby open field and answer the following questions:
- Describe the texture of the soil you observed (e.g., gritty, smooth, sticky).
- Based on your observation, do you think it is more like sand, silt, or clay? Give a reason for your answer.
- Suggest one crop that might grow well in that type of soil.
Lesson Keywords
- Soil Texture – The relative proportion of sand, silt, and clay particles in the soil.
- Sand – The largest soil particles, feeling gritty.
- Silt – Medium-sized soil particles, feeling smooth and floury.
- Clay – The smallest soil particles, feeling sticky and plastic when wet.
- Aeration – The process by which air circulates through the soil.
- Water Retention – The ability of soil to hold water.
Differentiation
For learners who may struggle, provide simplified definitions and more hands-on opportunities to feel and compare soil samples. Use visual aids like texture charts. For advanced learners, encourage them to research how different soil textures affect specific crops or discuss the role of organic matter in modifying soil texture.
Suggested Lesson Videos
For further understanding, search on YouTube for: “What is soil texture JSS 1” or “Types of soil particles for agriculture”.
Teacher Guide for Using This Lesson Plan
Before the lesson, gather diverse soil samples (sandy, silty, clayey if possible) and ensure labels are ready for the practical activity. Begin by linking to students’ prior knowledge about soil to engage them. When explaining soil texture, use the chart to visibly show particle size differences. During the practical identification of sand, allow ample time for each student to feel the samples. For the group activity of taking and labelling samples, clearly define the collection areas and supervise closely to ensure safety and proper labelling. Emphasise collaborative learning and critical thinking throughout the lesson. Students should copy the Board Summary notes after the evaluation to consolidate their learning. Ensure all questions asked during evaluation directly relate to the content taught.

Community Join the conversation Open discussion +